


The Maslow CNC is a one-of-a-kind CNC router that lets you work on large workpieces at an unbelievably low price.
While there are small Chinese CNC machines available at that price range, the Maslow CNC offers the ability to work on 4×8 sheets.
At the price of the Maslow, it almost sounds too good to be true that it can be a good CNC router, especially with a 4’x8′ size.
In this review, I dive deep into all the aspects of the Maslow CNC and present to you whether it lives up to its expectations.
I considered several factors like ease of use, size, material capabilities, speed, build quality, electronics, software, and customer support to come up with this review.
Since Maslow is an open-source project, there are several brands that make kits for the Maslow CNC.
However, the best and most popular among them is the one by Makermade, and that’s the particular Maslow kit I chose to review.
In the last part of this guide, I provided an overview of how to DIY the non-supplied components (frame, sled, etc) of the Maslow CNC and cost analysis of making it.
MellowPine is reader-supported. When you buy through links on my site, I may earn an affiliate commission at no extra cost to you.
What’s in this review?
Maslow CNC Review [In-depth]
1. Size of Maslow CNC
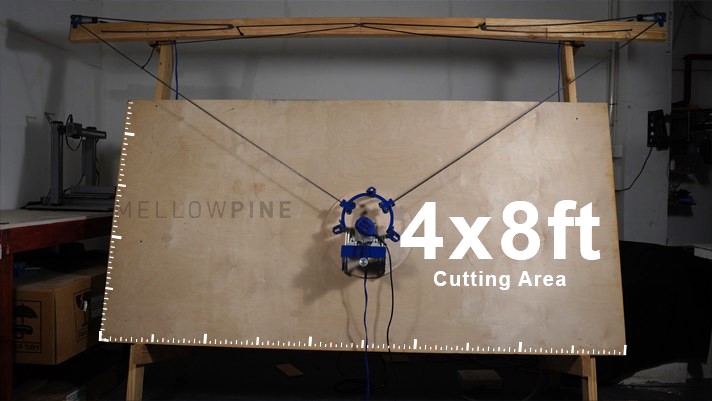
Maslow CNC is a great option when you have limited space in your shop but need to work on large workpieces.
The available work area is 4’ x 8’ which lets you work on full-size boards without cutting them down first.
This is because, unlike traditional CNC machines, Maslow CNCs have a vertical work bed which reduces the footprint considerably.
However, there is a lot of flexibility with regard to the overall size of the machine as much of the frame is built as DIY.
For example, if you set it up to have a maximum length along the X-axis the footprint could be something like 10’ x 3’.
If you want maximum width along the Y-axis, the footprint could be 6’ x 3.5’.
However, you will need considerable vertical space to operate a Maslow CNC router.
If you don’t want to work on 4×8 sheets, you have the option of building a smaller frame.
In my opinion, you should assemble it to have the maximum work area as it will come in handy if you ever need to work on full-size sheets.
You can use workpieces with a maximum thickness of 1.625” on this kit.
However, the vertical travel you get also depends on the router you choose with this CNC.
2. Material Capability
You can cut hardwood, plywood, MDF, softwood, laminates, acrylic, nylon, uPVC, hard PVC, polycarbonate, polyethylene, soft PVC, and thin aluminum sheets using this CNC.
The maximum cutting speed you can achieve is around 31 inches per minute (ipm), which is quite slow compared to more expensive CNC machines.
To give an extreme example, the Avid CNC- PRO4896 4×8 CNC Router has a feed rate of nearly 390 inches per minute for a similar depth of cut but with a larger tool.
However, the Avid CNC 4×8 costs around fifteen times more than Maslow, so you have to consider that as well.
This CNC kit is for hobbyists and makers who have plenty of time to tinker with their CNC machines to get good results.
To someone running a business, the time spent on setting it up and waiting for the cuts to finish can be a bit excruciating.
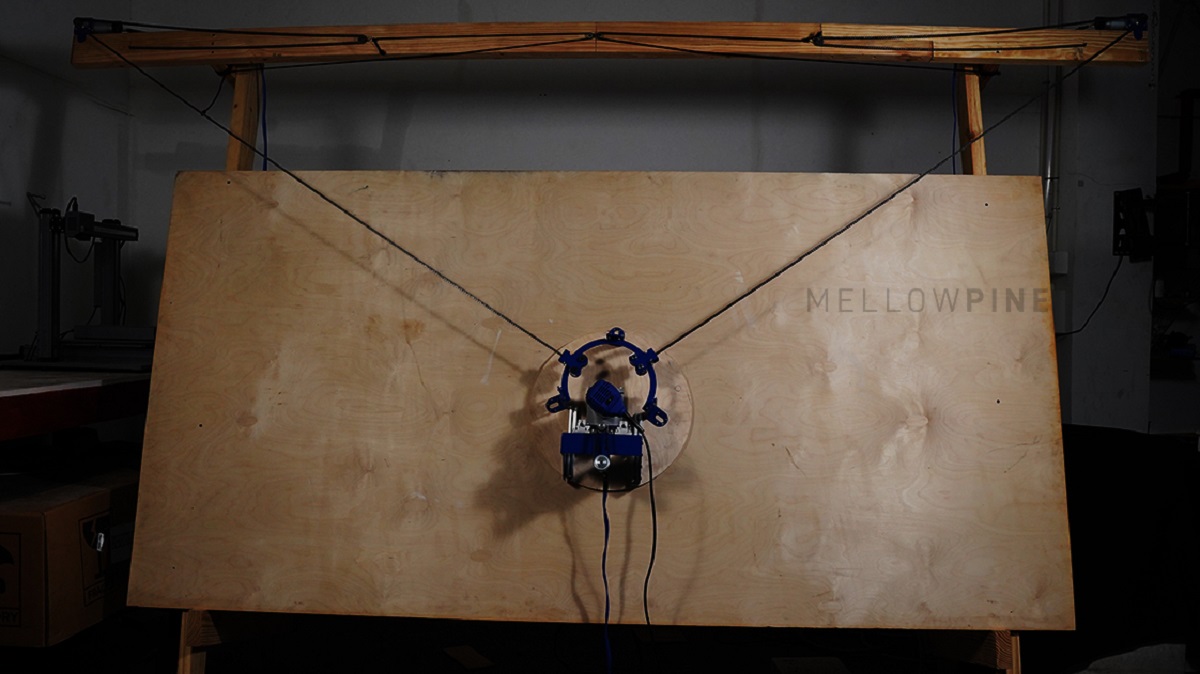
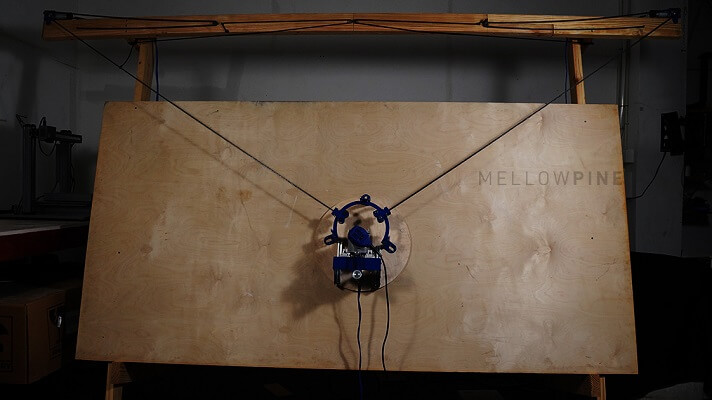
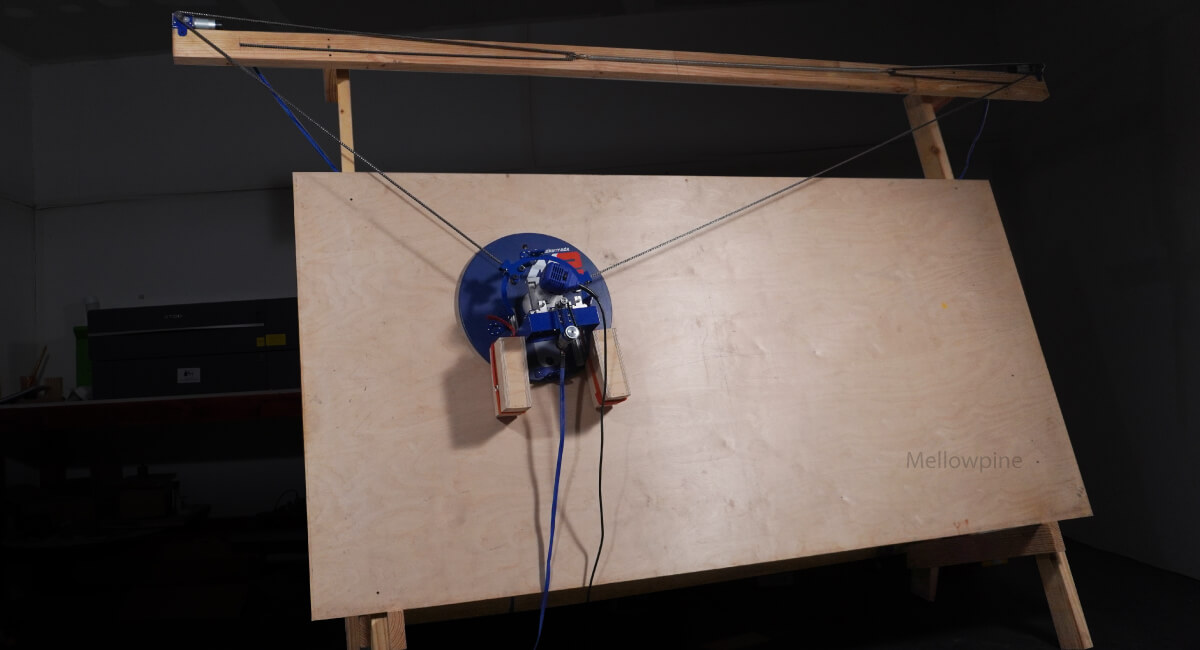
3. Work bed/Canvas
The vertical work bed/canvas you see in the pictures is not included in the Maslow kit.
You need to build it using the instructions and designs provided by MakerMade.
Most people make the work bed out of plywood.
Plywood has good strength, and it is relatively easy to work with.
Most of the weight is supported by the frame, and the load on the work bed is less when compared to horizontal beds. So, flexing of work bed isn’t really a concern.
4. Frame of the Maslow CNC
What you get when you buy the Maslow kit are mounts, some mechanical components, and electronic hardware.
The frame is to be built DIY by the user.
You can build the frame from regular lumber.
If you follow the plan from Makermade, the materials for the frame and plywood work bed will cost you under $100.
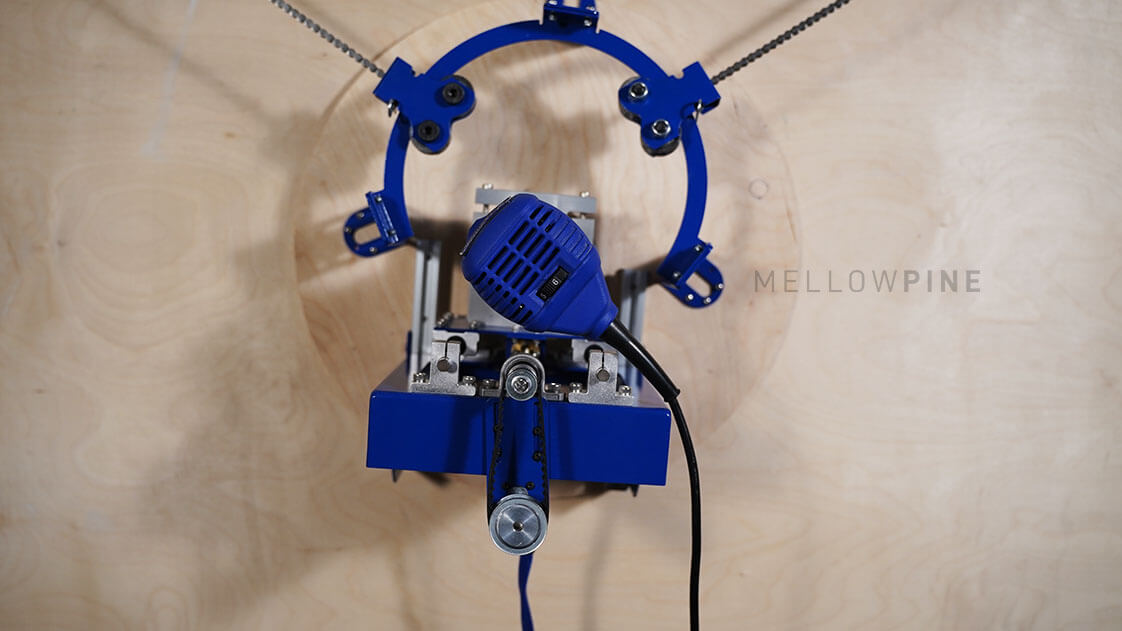
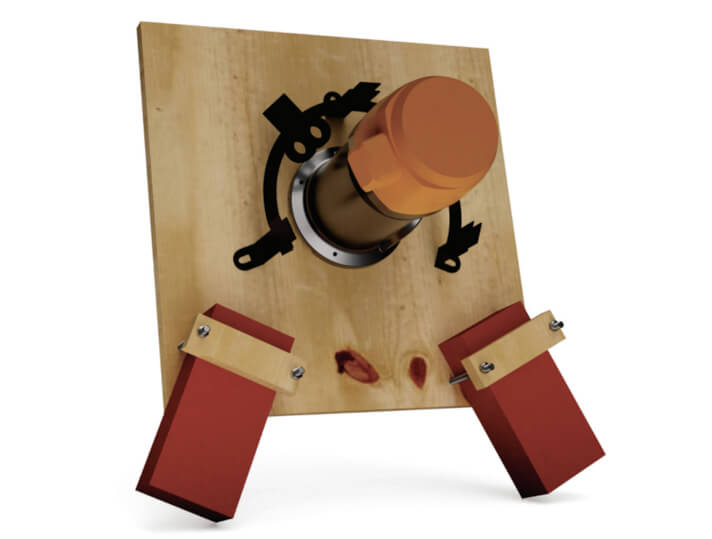
The router is supported on a circular ring made of metal and a plywood board.
This whole arrangement is called the sled of the Maslow CNC.
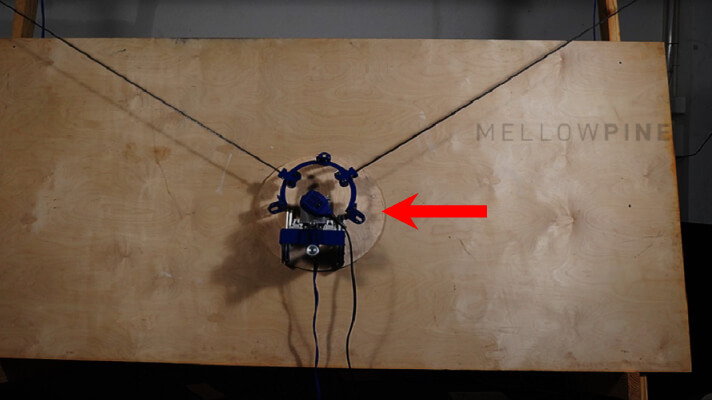
The sled has two mounts for holding two bricks. The weight of the bricks keeps the sled steady while cutting, and it also aids in proper motion.
The base of the sled is not provided in the kit, and you will have to make your own base.
The metallic ring is provided in the Makermade kit though.
However, MakerMade sells a for around $50 more than the one without the sled.
Since the extra cost is not much, I suggest you choose the one with the pre-made sled.
The Maslow CNC has an acceptable accuracy of 0.004 near the center and around 0.02 near the corners.
The accuracy of your projects would depend upon how well you dial it in during the calibration process while assembling the kit.
One of the major concerns is the bowing of long cuts. Typically, a deviation of up to 1/16″ has been observed while making straight cuts longer than 6 feet in one go.
MakerMade has improved the accuracy of the machine by fine-tuning the software with updates, but the Maslow CNC still isn’t perfect for long cuts.
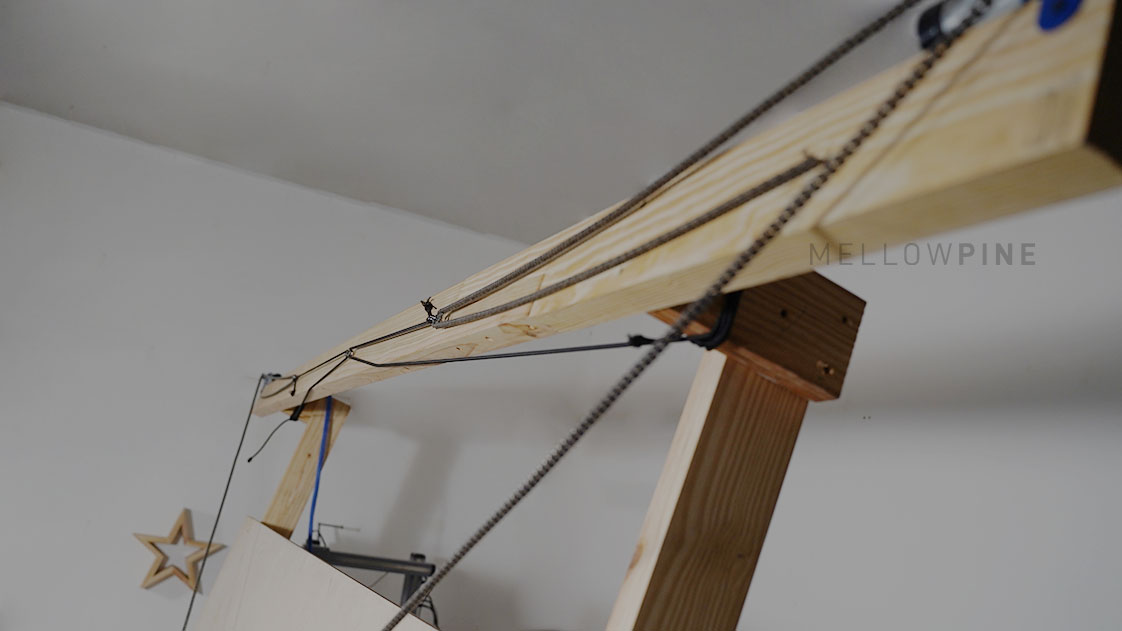
5. Linear Motion in Maslow CNC
Linear motion in the Maslow CNC machines is interesting and unique.
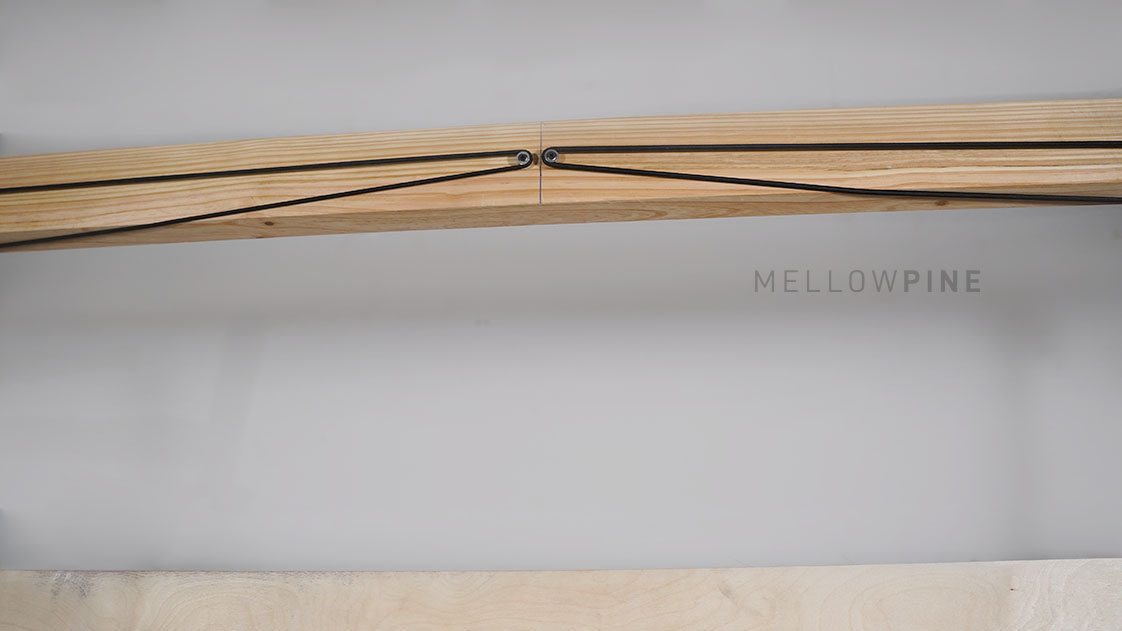
A pair of motors placed on the top corners achieves the X and Y axis motion.
The X and Y movement is helped by gravity working in favor as well.
You could compare the movement of the router on the drive chains with the movement of a Yo-Yo on its strings.
The position is determined by the slack or pull on the strings on either side.
The kit comes with 11 feet of drive chain for the axes with an option to purchase a 15’ long chain.
If your frame is much larger than your work area, you will need the 15′ long chain.
However, if you follow the plans by Makermade you’ll need only the 11′ drive chain.
You will have to maintain proper tension in the chains for good performance and results.
The chains are moved by the sprocket wheels placed at the two top corners of the frame and the chains drag the sled over the work area.
Z-Axis motion in Maslow CNC
Makermade provides a Z-axis stepper motor and its’ mount in its CNC kit.
The stepper motor is coupled with the bit height adjustment knob on the router.
The Z axis motor turns the height adjustment knob on the router to adjust the depth of cut.
This is why Maslow specifies using a router with a height adjustment knob.
On most routers, the adjustment available is about 1.625” and varies from router to router.
Earlier versions of Maslow didn’t have this feature and the Z-axis had to be manually adjusted to change the depth of cut.
This is why Makermade advertises their Maslow CNC kit as -“Maslow CNC Kit with Z-Axis by MakerMade”.
6. Router
The kit does not come with a router. You will need to purchase a fixed base router that has Z-axis plunge feature.
MakerMade recommends the Ridgid R22002 or the Bosh POF 1200 (EMEA) for use with their Maslow CNC kit.
Depending on the router you select, you can use tools with a shank diameter of ⅛”, ¼”, or ½”.
7. Upgrades for MakerMade Maslow CNC
2020 Maslow-to-M2 Upgrade Kit by MakerMade
This upgrade will convert your existing Maslow CNC to the Maslow M2 version by MakerMade.
The M2 upgrade will give you improved performance and feed rates.
Makermade promises 40% higher cutting speeds with the M2 upgrade.
With this upgrade, you will be able to integrate a dust collection system to Maslow.
It also makes Maslow ready for attaching a laser engraver (from Jtech Photonics).
This upgrade kit can be purchased from the official website of MakerMade for around $550.
8. Controller and Electronics on Maslow CNC
Motors
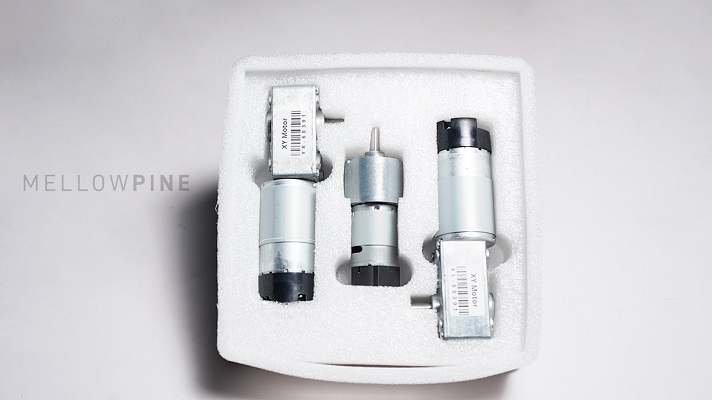
The chain drive system is driven by closed-loop geared DC motors.
The motors come with an encoder that translates the number of revolutions made.
The controller uses this data to maintain a good level of accuracy.
The motors have low torque, which is why they come with a gearbox to improve the torque. This means the motor is spinning faster than the sprocket.
The motors have just enough power to drag the sled over the work area at a pace of around 30 inches per minute.
You cannot push them to go any faster.
Controller
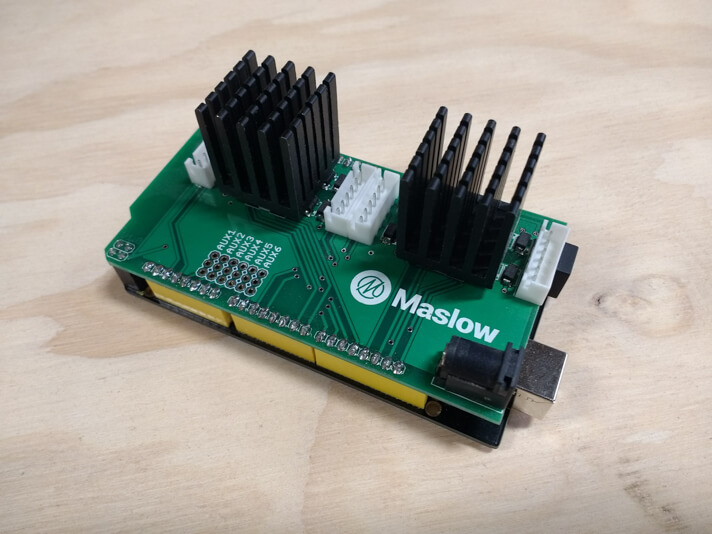
Maslow uses an Arduino Mega 2560 board as the main control board.
The Arduino board is paired with a v1.2b Arduino shield from MakerMade.
The v1.2b shield is what drives the DC motors on the three axes.
The firmware used for the board is the Holey v51.28 which has been developed for Maslow CNC machines.
The controller and the associated electronics can draw a maximum current of 5A, which is within the limits for a common wall socket.
You can connect the controller with your computer using a USB-B cable, which is the only connectivity option.
9. Software for MakerMade Maslow CNC
MakerMade provides their custom software Makerverse for controlling the kit. Makerverse is a free software.
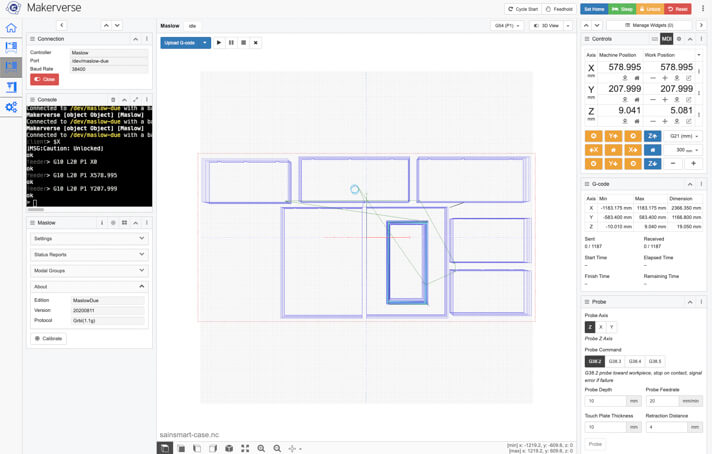
It is a modified build of the open-source cncjs GRBL control software that has been configured to work with the Maslow CNC kit.
Makerverse is a web-based control software that uses a web browser to function. However, it does not require an internet connection to function.
You have to install the software on your computer and then access it using a web browser on your computer.
The software is easy to use and has a clutter-free user interface.
MakerMade also provides a few sample programs that you can use to get started with Maslow.
You will have to use a CAD/CAM software to create designs, as the Makeverse software is only for sending the G-code to the machine.
Makeververse CNC software is compatible with Windows, Mac, and Raspberry Pi operating systems.
10. Assembling the Maslow CNC
Maslow is a DIY type of CNC kit that requires you to spend some time building it.
You will have to build the frame and wasteboard for the kit using wood and plywood.
If you know basic woodworking, it should take you around five hours to build the frame.
Once you have the frame ready, you can add the electronics and install the software, all of which takes about an hour.
You will need about a couple of hours to build a temporary sled and calibrate the kit, after which you can cut out the final sled using the CNC kit.
The calibration part can be a bit tricky, and you need to be precise to get it to work with good accuracy.
The more time you spend dialing in the accuracy, the better your results will be.
You also need to consider the time spent in sourcing the materials required for your MakerMade Maslow CNC build.
The entire assembly process should take around 10 hours to complete.
Overall, assembling Maslow will require some persistence.
However, it is worth it for many hobbyists considering the money they save on the machine.
The assembly instructions and guide videos are excellent, and you are unlikely to face many issues due to lack of instruction.
There are several assembly videos from Maslow CNC users on YoutTube that you can refer to.
I have provided an overview of the DIY process at the end of this review to give you an idea of what you’re getting into.
11. Community
Maslow CNCs have a huge user base with several active users on many online forums who share ideas and help you to troubleshoot.
MaslowCNC has a highly active forum for their CNC kits where you can find ideas and also solutions to your issues.
You can also find several interesting projects on Maslow’s community pages that can be used to build upon.
In addition, Makermade has a Facebook group of its own where you can find a community dedicated to just Makermade Maslow CNCs.
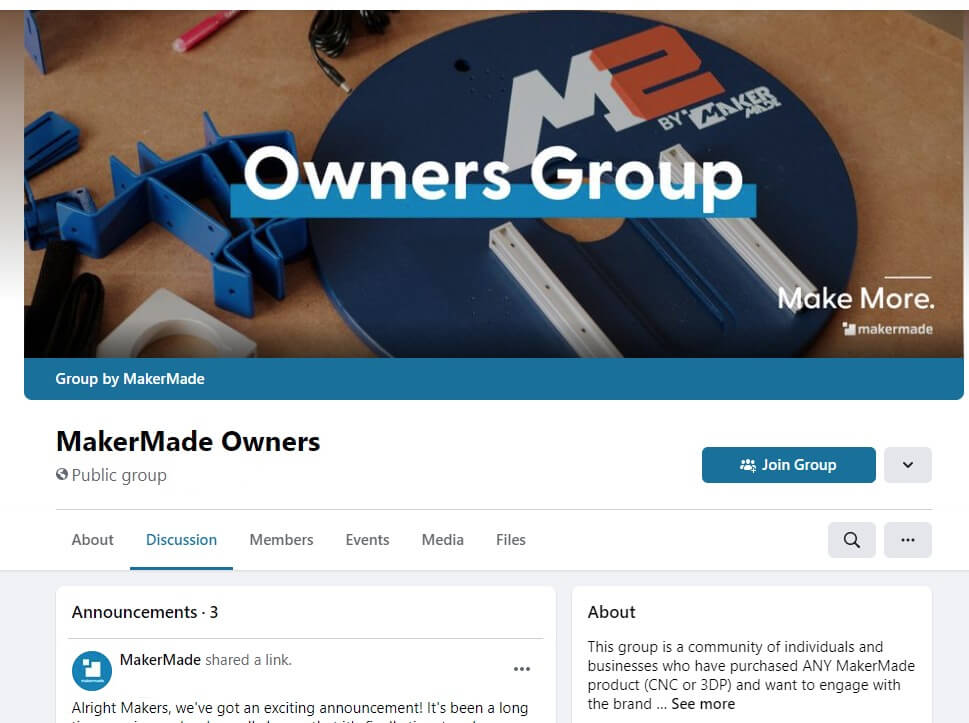
MakerMade also provides a good amount of online resources for helping you with everything related to the Maslow CNC kit.
12. Customer Support
The customer support from MakerMade is good and reliable. They offer phone and E-mail support for their customers.
MakerMade has a US-based customer support team that is prompt in finding solutions to your queries.
You get a one-year limited warranty for the MakerMade Maslow CNC kit, which is a point in favor of this kit over other Maslow CNC kits.
MakeMade also conducts a weekly live Q&A session on Zoom which gives you the opportunity to ask questions regarding the kit directly to the founder.
13. Final Thoughts
MakerMade Maslow CNC kit is a super affordable and functional CNC router that lets you work on 4’x8′ sheets.
It’s ideal for users who love to tinker and DIY with their CNC machine.
If you want a fully done for you type CNC, Maslow is probably not it.
It takes up very little floor space and allows you to perform CNC cutting on large sheets within a limited floor area.
While considering the cost of the kit, you must also consider the cost of the materials for building the frame and the cost of a router for your build.
| Component | Cost | |
|---|---|---|
| 1 | Makermade Maslow CNC Kit | Check Price |
| 2 | Cost for DIY Frame | ~$90 |
| 3 | Cost for DIY Sled | ~$10 |
| 4 | Cost for Router | ~$350+ |
Total Cost of Makermade Maslow CNC Setup
It is unbelievable how popular this CNC has become despite having its beginnings in a college summer project.
The projects on the Maslow community garden are a testament to the extent to which this CNC can be pushed.
If you don’t mind the relatively slow speed, and if you are willing to play around a bit to get the settings right, the Maslow CNC can be a great choice, especially for those who want to dip their toes in the world of hobby CNC.
Alternatives to Maslow CNC
If you aren’t impressed by Maslow CNC, you have other options.
However, all of them are more expensive and cost at least $1,000.
The next most affordable options are the BobsCNC Evolution 3 and Evolution 4 CNC routers.
I have reviewed them in detail here-
If you don’t want to work on large workpieces and can do with CNC engraving small parts, a 3018 desktop CNC router is also an option.
Those are cheaper than Maslow CNC.
Making Maslow CNC Machine Components-DIY
The frames and workbed for Maslow CNCs are usually not supplied with the kit. This is to reduce the shipping size.
However, you can build the frame and sled for your Maslow CNC kit using guides available online.
There are several designs for the frame and sled, but the one from MakerMade is one of the well-detailed and easy-to-make designs.
You can follow the MakerMade Maslow CNC frame build guide to build a frame for your Maslow CNC kit.
1. Building the frame
| Description | Dimension | Length/Thickness | Quantity | Price |
|---|---|---|---|---|
| Wood | 2″ x 4″ | 10′ | 7 | ~$30 |
| Wood | 2″ x 4″ | 8′ | 1 | ~3.5$ |
| Wood | 2″ x 4″ | 6′ | 1 | ~2.5$ |
| Plywood | 4′ x 8′ | 0.75″ | 1 | ~$40 |
| Wood screws | 2.25″ | – | 100 | ~$6 |
| Wood glue | – | – | – | ~$8 |
| Total cost | ~$90 |
Materials for building the frame of MakerMade Maslow CNC
Tools Needed: Saw, Power drill, Screwdriver
To begin with, you will have to cut the 2″ x 4″ wood bars according to the cut lengths mentioned in the MakerMade frame build guide.
Minor variations in the length are acceptable as it does not has any significant influence on the accuracy of your Maslow CNC build.
However, make sure the cut pieces are properly squared, as the squareness of the bars has a direct effect on the accuracy of your build.
Once you have all the cut pieces, you can join them together using woodscrews and glue according to the design provided in the frame build guide.
You can also attach the 4×8 ply onto the frame, this will act as the wasteboard for your CNC build.
The entire process will take around five hours to complete, and it will require a bit more time for the glue to dry before you can use the frame.
2. Installing the electronics
Tools Needed: Powerdrill, Screwdriver, Computer, Internet Connection
All the electronics for the Maslow CNC build are provided in the kit. All you need to do is configure and install them in the proper place.
Before you start installing the electronics onto the kit, you first need to do some basic setup on the controller board.
You must download the latest development environment for the Arduino board and install it on your computer.
Once you have the latest Arduino IDE, you can download the Holey firmware from MakerMade, which is used to control the device.
You can then flash the Holey firmware onto the Arduino board.
The next step is to install the Makerverse software on your computer, which will provide you a graphical user interface to control your CNC kit.
With all that done, you can then install the motor mounts and attach the motors to the frame.
You can find the links for the download and detailed instructions in the assembly manual provided by MakerMade.
3. Building the sled
| Description | Dimension | Length/Thickness | Quantity | Price |
|---|---|---|---|---|
| Plywood | 18″ x 18″ | 0.75″ | 1 | ~ |
| Machine screws | Size 10 | – | 32 | ~ |
| Bricks | 1″ x 4.5″/ 1″ x 5.5″ | – | – | ~ |
| Total Cost | ~$10 |
Materials for building the sled for MakerMade Maslow CNC
Tools Needed: Router, 1/4″ Router bit, Handsaw or Circular saw 5/16 Allen wrench, Power drill, Screwdriver, Socket wrench, Clamps.
The sled on a Maslow CNC holds the router and moves across the work area to make the cuts.
You can make a temporary sled from an 18″ x 18″ plywood board. All you need to do is find an appropriate plyboard and attach the metal chassis that comes with the kit.
Also, you will have to drill holes in the plywood for the screws and for the router bit to pass through.
You can then attach a holder for the bricks. You can make brackets out of 1″ x 5.5″ wood for this.
Once you make the temporary sled, you can make the permanent one using the CAD design file provided by MakerMade.
4. Setting up the Z-axis
Tools Needed: Screwdrivers, Computer, Makerverse Software
All the hardware components for this setup, except the router, are included in the kit.
The Z-axis motion is achieved by attaching a software-controlled motor to the manual height/plunge adjustment knob on your router.
You will have to fix the motor mount onto the sled and mount the motor in a way it could couple with the height/plunge adjustment shaft on your router.
MakerMade provides detailed instructions on how to do it on a Rigid brand router, but you will be able to figure it out easily for any other router as the basic principles are the same.
5. Calibration
Tools Needed: 1/4″ router bit, Power drill with 1/2″ bit, Computer, Makerverse software
This is the final and most crucial step of your Maslow CNC router-building process, as it will determine the quality of the cuts that you can achieve.
You will have to use the software to adjust the length and slack in the chains that drive the system and set them.
Then you will have to set the center position of the sled in the software.
This whole process is about describing the work area and setting up of your build to the software. The software will use this reference data to plot the cuts for your projects.
You will have to perform various tasks described in the instruction manual by MakerMade, which will allow the software to figure out the various parameters of the machine.
Once the calibration is done, you can use your Maslow CNC build for your projects. If you want to get straight to cutting, MakerMade provides a USB stick with several projects that you can use to take your build for a spin.
You might be interested in these:
Frequently Asked Questions (FAQ)
Can I shrink or extend the 4’x8′ work area of the Maslow?
Yes, you can shrink or extend the 4′ x 8′ work area on the Maslow. You will have to build a frame of the appropriate size. The size parameters can be adjusted in the software while calibrating your build. However, if you want to extend the work area you will have to purchase some additional length of the #25 roller chain that comes in the kit. This is because the kit comes with 11 feet of chain which is sufficient only for a work area less than 4′ x 8′.