


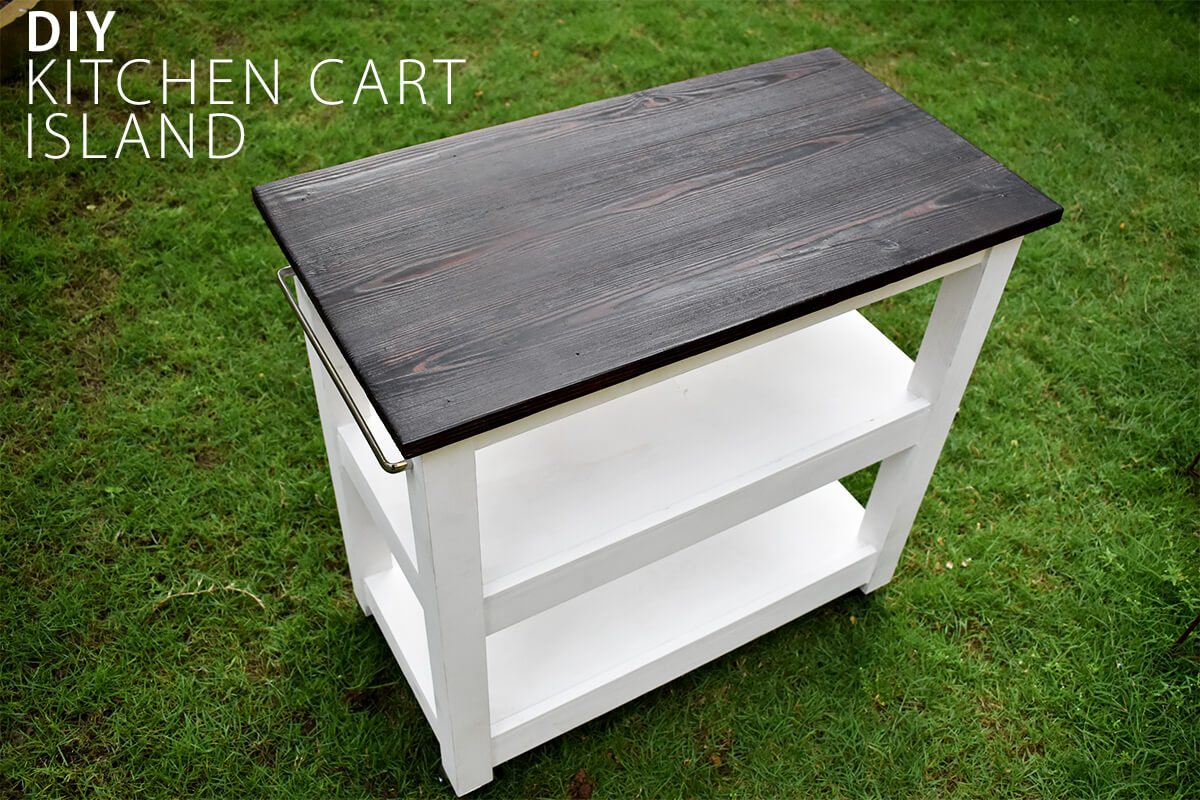
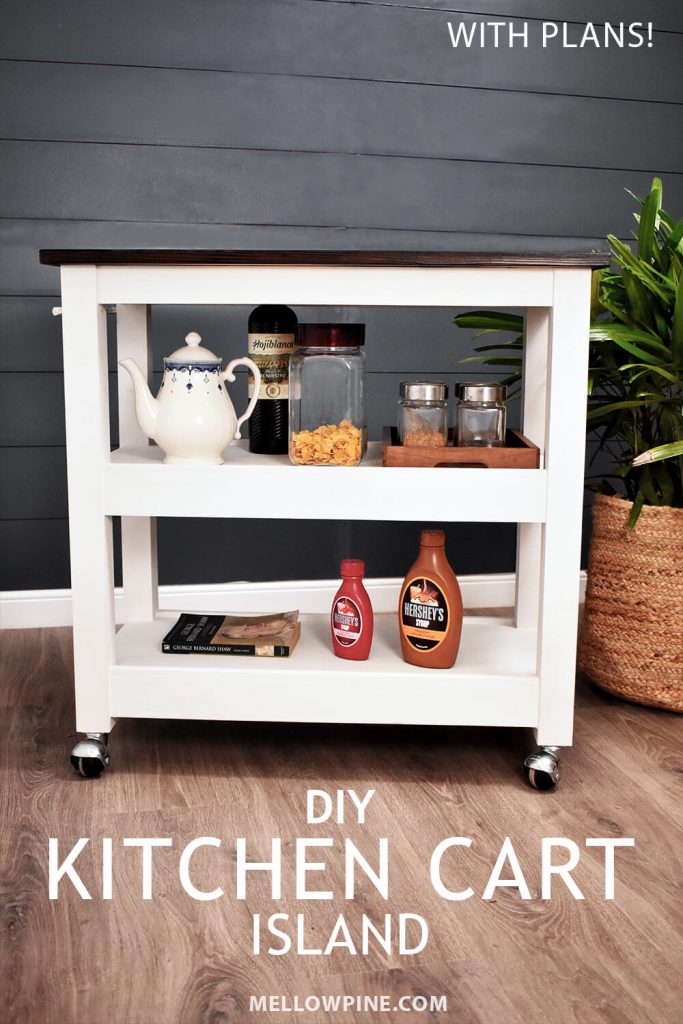
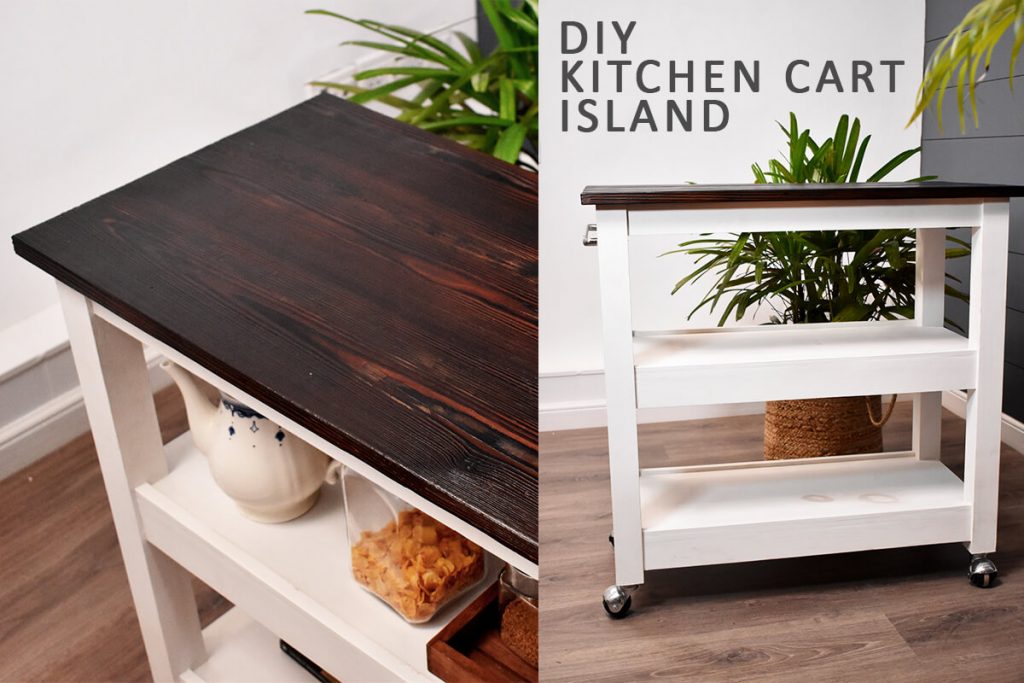
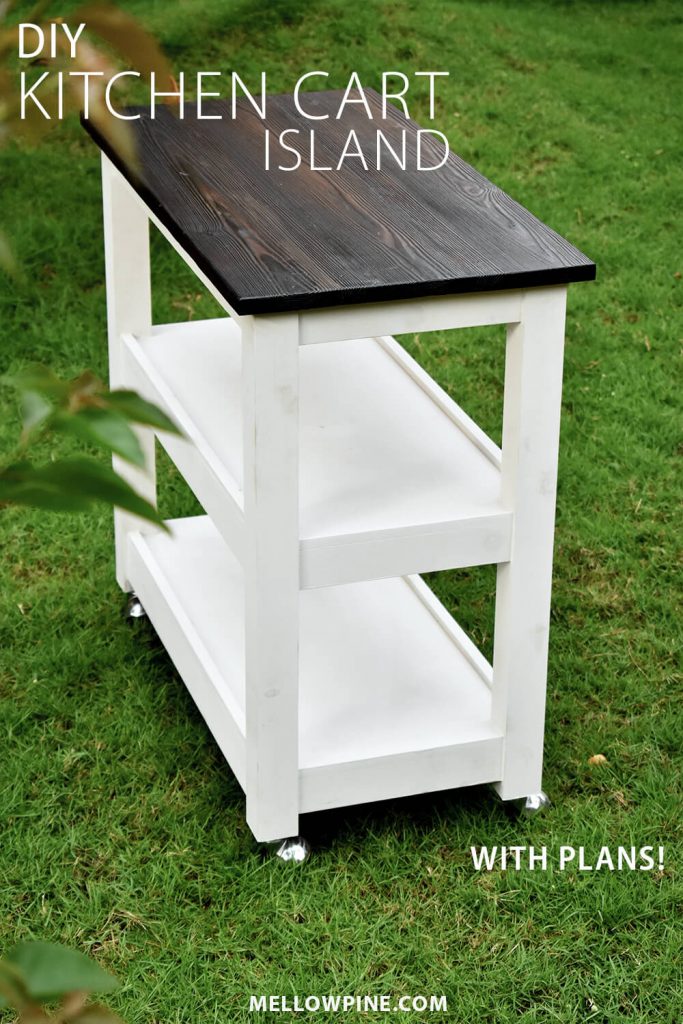
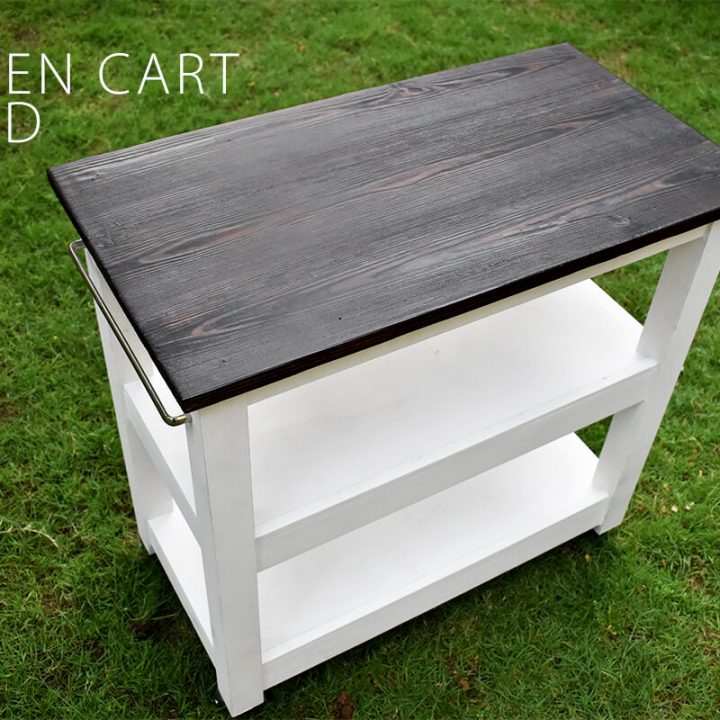
Hey guys, this is Susan. As requested by a lot of readers, I’m finally posting the detailed build plan for the DIY Kitchen Cart on wheels we made for our kitchen and outdoor barbecue.
We build the entire cart from regular pinewood lumber and painted the bottom frame.
For the tabletop, we used the Shou Sugi Ban wood burning technique to get that coal-black tone to contrast with the bottom part.
Also, some people like to call this a kitchen island as well.
DIY Kitchen Cart on Wheels-Build Video

Subscribe to Mellowpine_DIY on YouTube for getting our latest DIY videos in your YT feed- Subscribe to Mellowpine YouTube Channel
MellowPine is reader-supported. When you buy through links on my site, I may earn an affiliate commission at no extra cost to you.
Things You Need For This Build
Materials
- 2 x 2 Lumber- 2 in. x 2 in. x 8 ft. Furring Strip Board Lumber – 2 Nos. (For the legs)
- 2 x 3 Lumber- 2 in. x 3 in. 96 in. Premium Kiln Dried Heat Treated Whitewood Stud – 2 Nos. (For the bracing pieces)
- 1 x 6 Lumber – 1 in. x 6 in. x 8 ft. Premium Kiln-Dried Square Edge Whitewood Common Board -1 No. (for the table top)
- ½ inch thick plywood- Sanded Plywood – 1 Sheet
- 1/2 in. x 3/4 in. x 96 in. Pine S4S Moulding – 1 No.
- 1-¼ (available with the dowel jig kit)
- Wood Glue
- Rustoleum Chalked paint
- Heavy Duty Caster Wheels
Tools
Plan for DIY Kitchen Cart on Wheels
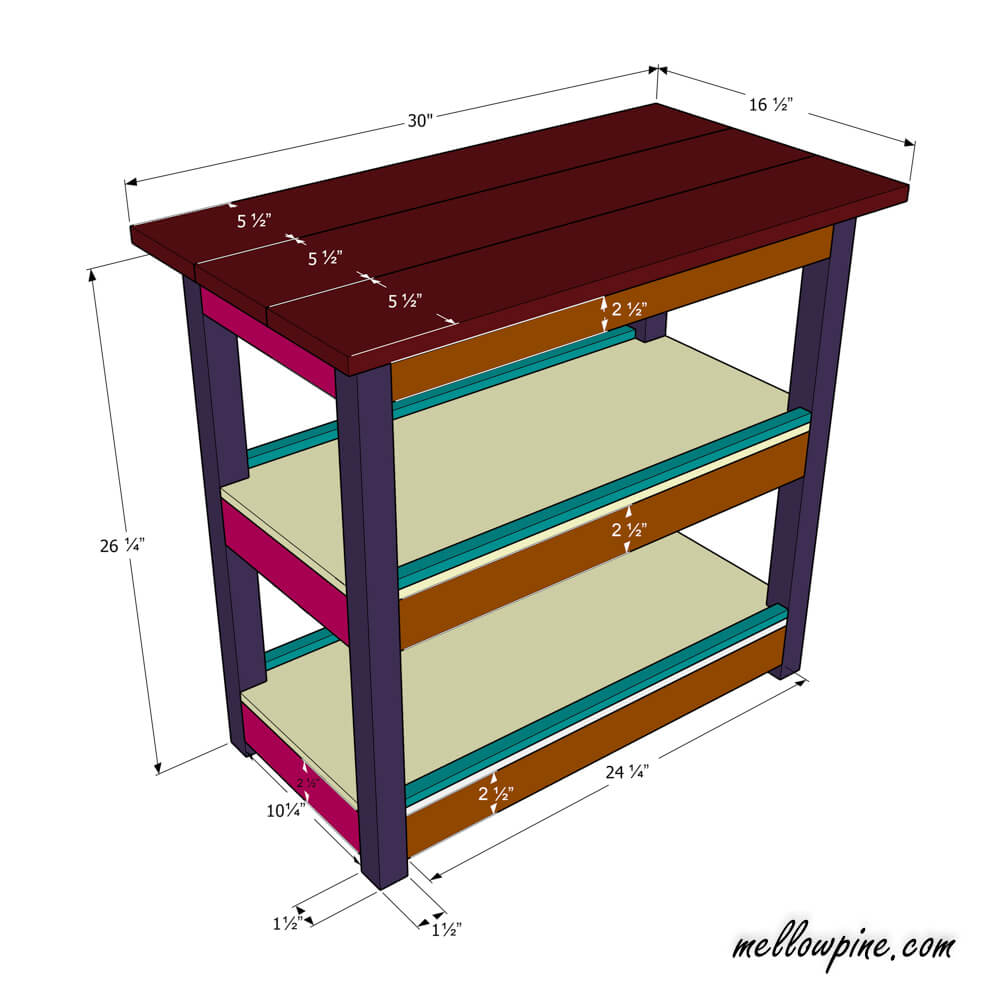
Please note the difference in dimension between nominal size and actual size. For e.g., 2 x 4 is the nominal size while 1-½” x 3-½” is the actual size. This is a standard convention.
How To Build The Kitchen Cart
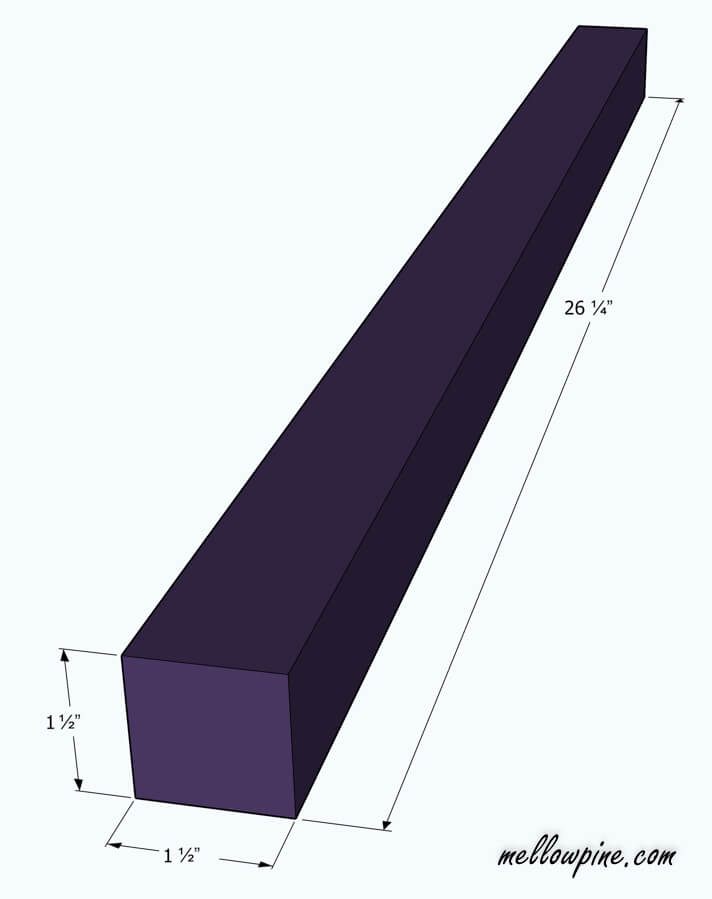
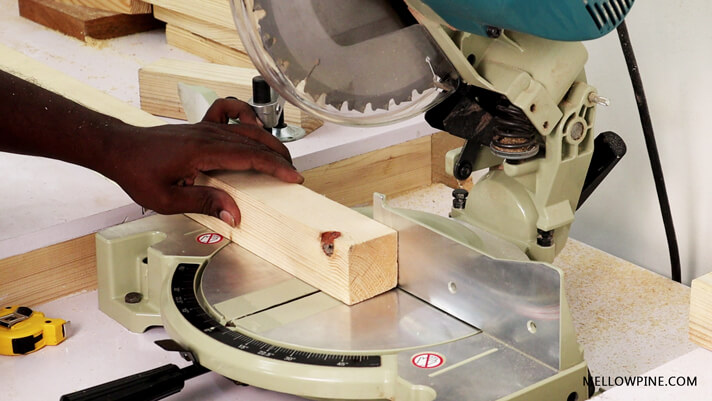
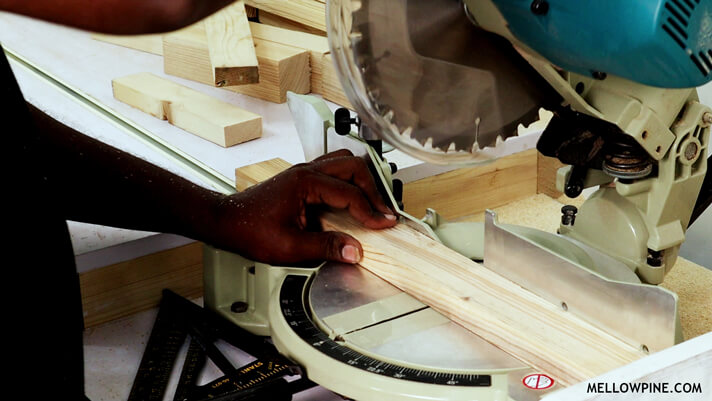
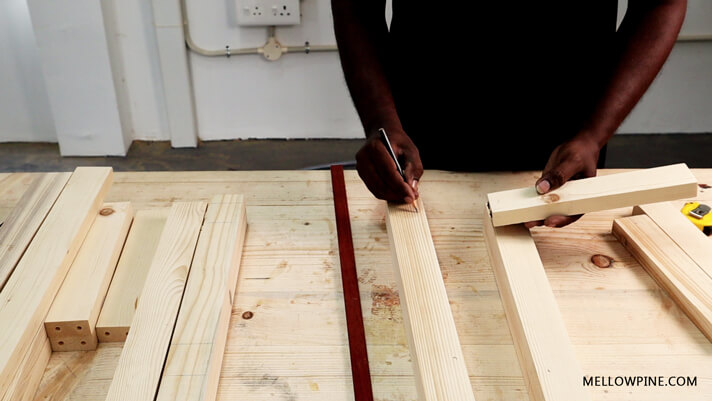
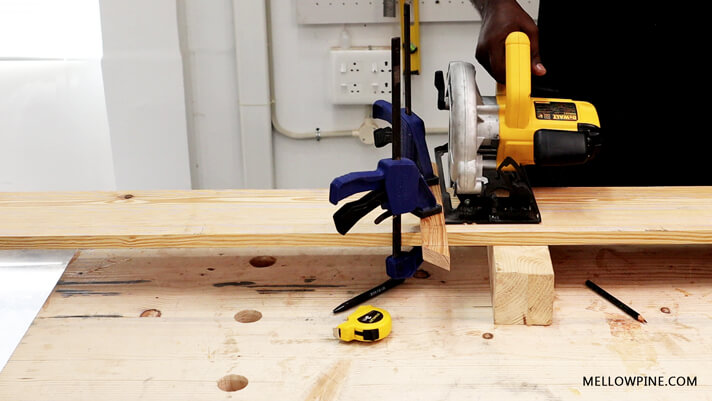
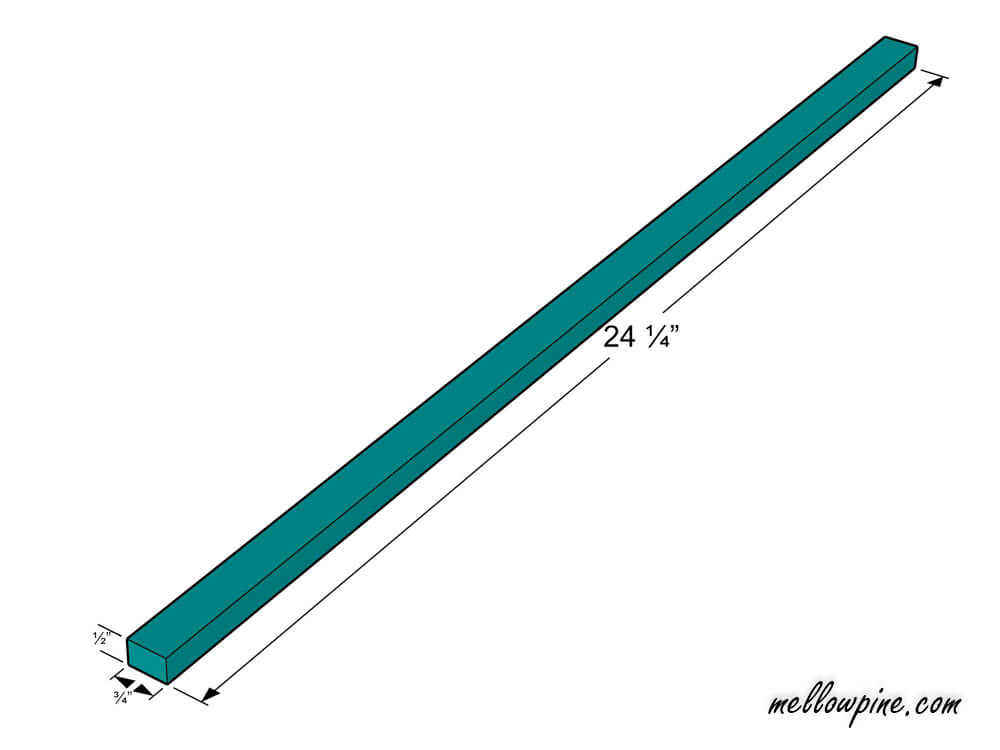
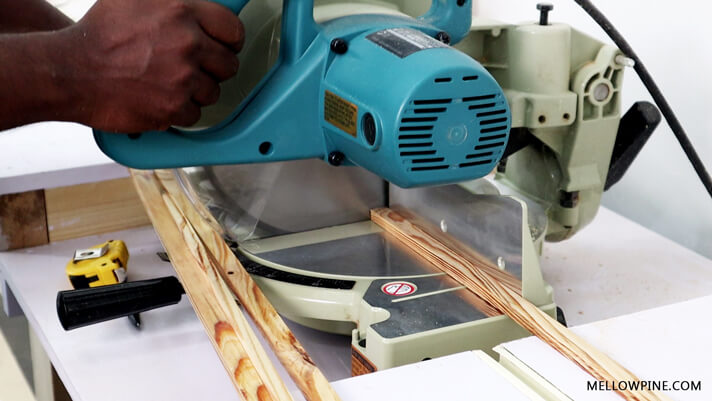
Step 1: As the first step we made the legs for the bar cart from 2 x 2 lumber. We needed four pieces of – 1-½” x 1-½” x 26 ¼” size for the four legs. We used the miter saw to make these four pieces.
Step 2: The next step was making the bracing pieces.
There are two types of bracing pieces for this build.
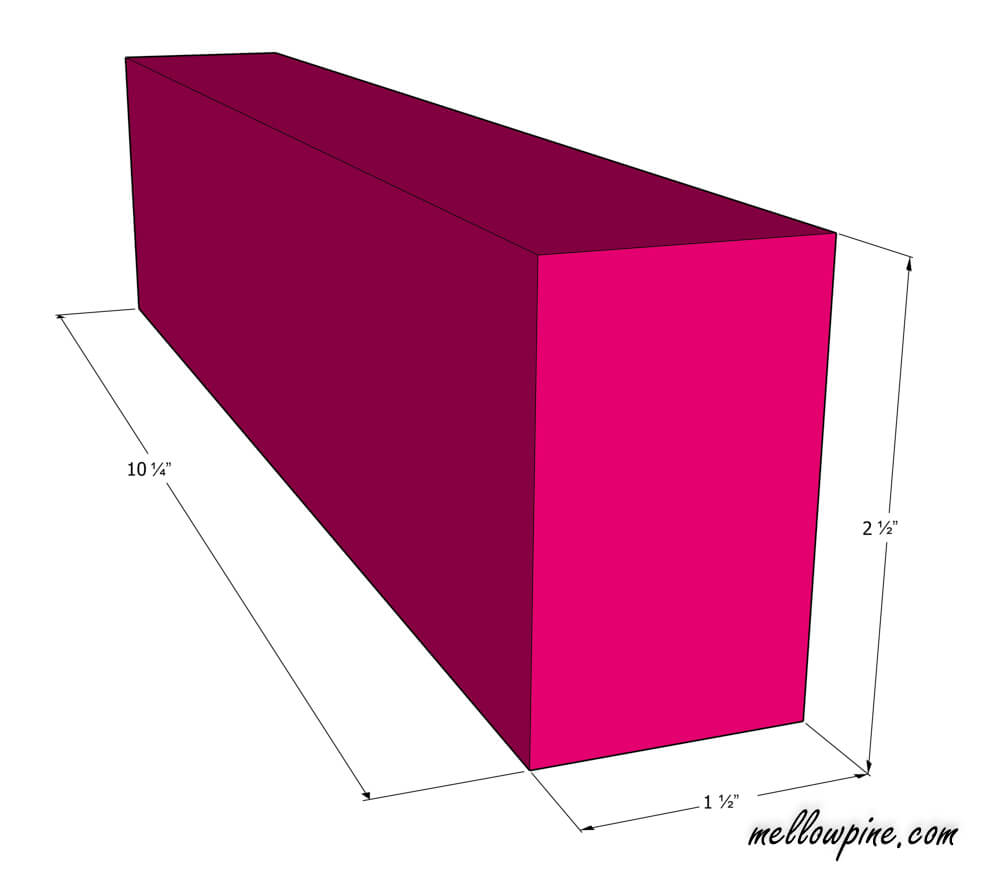
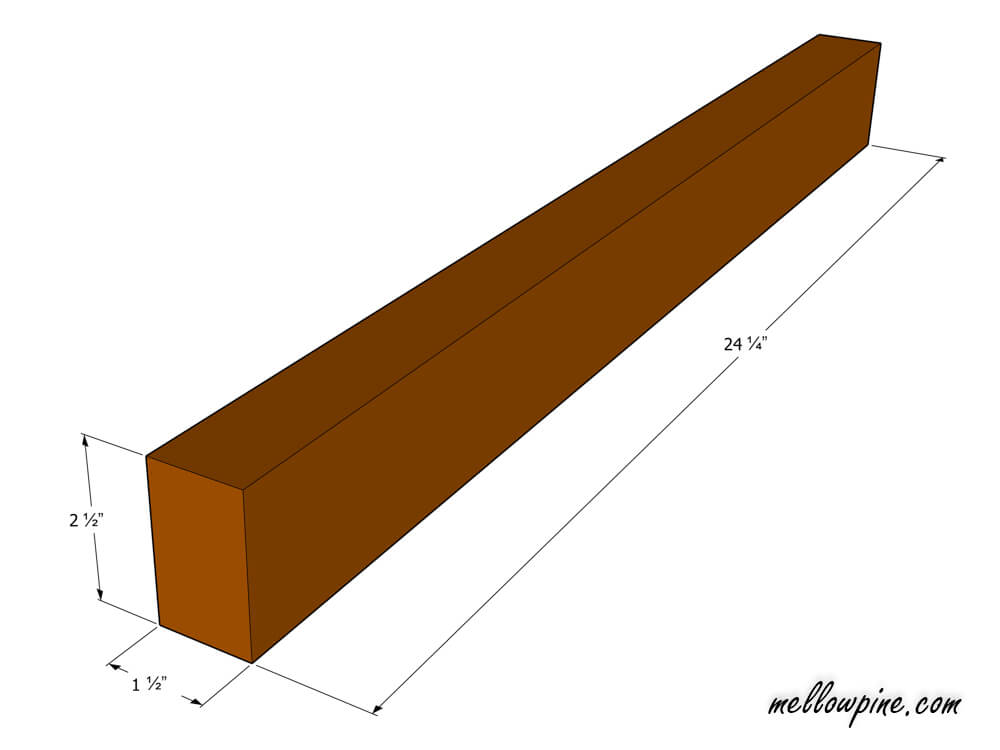
A longer one with 24 ¼” length and a shorter one with 10 ¼” length.
We needed 6 pieces of each type to do this build.
So we took 2 x 3 lumber and cut out 6 pieces of 1-½” x 2-½” x 24 ¼” size and 6 other pieces of 1-½” x 2-½” x 10 ¼” size.
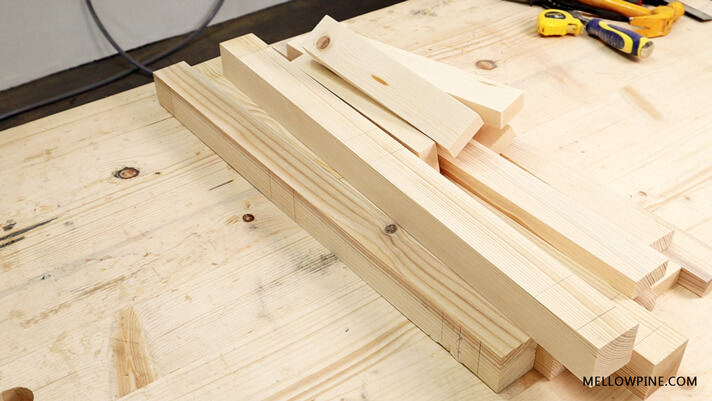
At this point, we were ready with four leg pieces, 6 large bracing pieces, and 6 shorter bracing pieces.

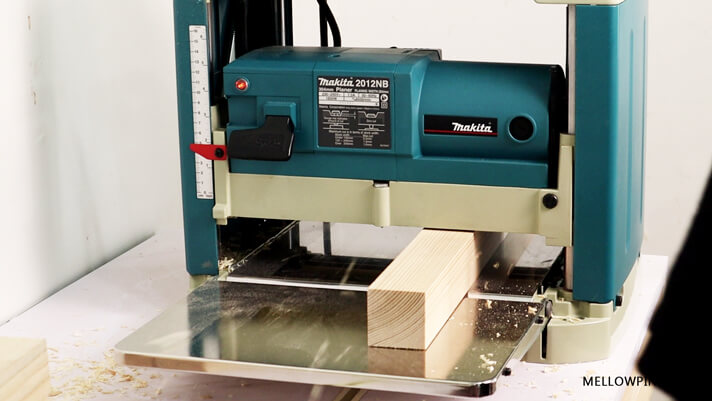
Step 3: As a next step we planed all the pieces by a millimeter to make sure the surface was smooth enough for sanding later.
If the pieces are not planed, you will need to do a lot of sanding until you get a smooth piece, unless of course, you buy each piece planed and sized already.
Step 4: So for this project, we use dowel joints to connect each piece.
It might look more daunting compared to a pocket hole joint, but with a doweling jig, it is super easy to make these joints.
Dowel joints are highly useful when the pieces are too thin to be connected with a pocket hole joint.
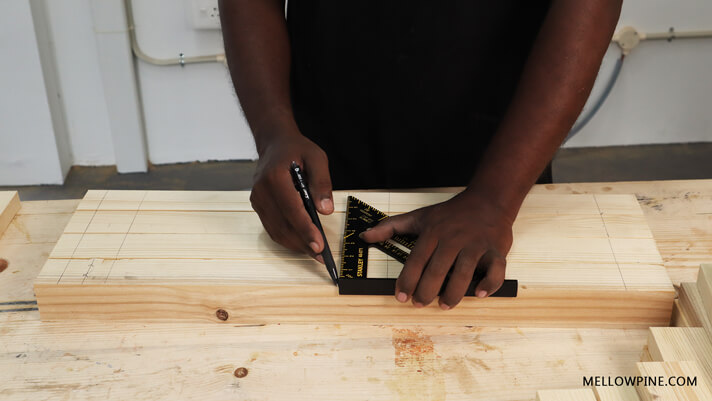
So next we had to fix where to drill the holes for the dowel joints.
On the leg pieces, we marked the locations where the bracing pieces had to be connected using dowel pins.
We did that for each leg. Notice that each leg piece will have bracing pieces coming in on two adjacent sides.
Step 5: Now, we did the sanding of each piece.
We should have done the sanding before marking the locations in step 4.
Our marked lines got partly removed when we did the sanding.
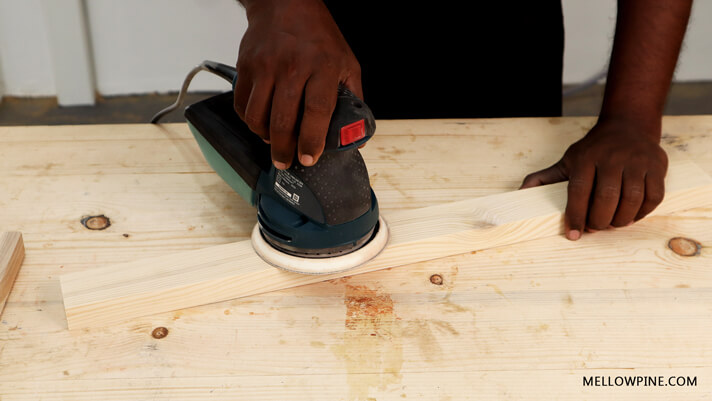
We sanded all the way from 120 grit to 220 grit for all the pieces we had made in the previous steps.
Dowel Joint
Step 6: Now we had to make the holes for the dowel joints.
For this, we used our drill and the dowel jig in combination.
The dowel jig helps set the size of the drill hole and makes it stay vertical while drilling.
You want the dowel pin to fit in snugly when hammered in with a mallet.
The hole must be just right, not smaller or larger.
To ensure uniform depth for all dowel joints, we need to set a drill stop on the drill while drilling.
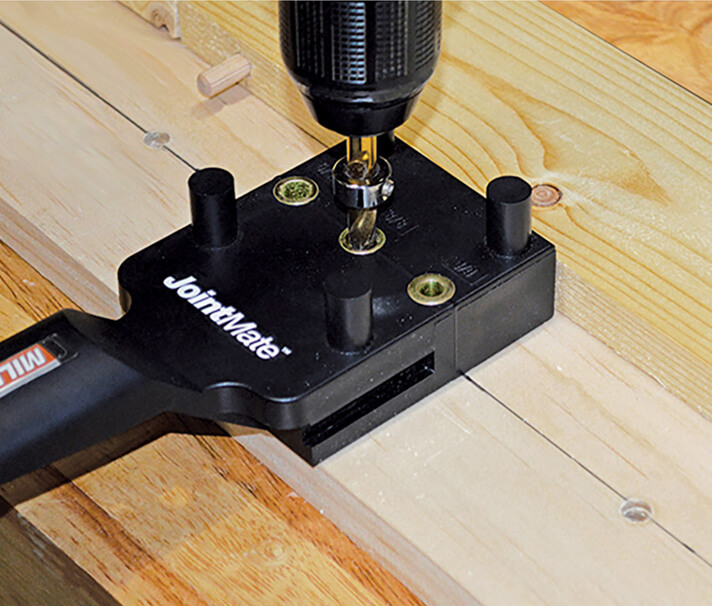
Note: I used an inexpensive Milescraft doweling jig.
It is not highly expensive like some of the other doweling jigs out there, but it does the job.
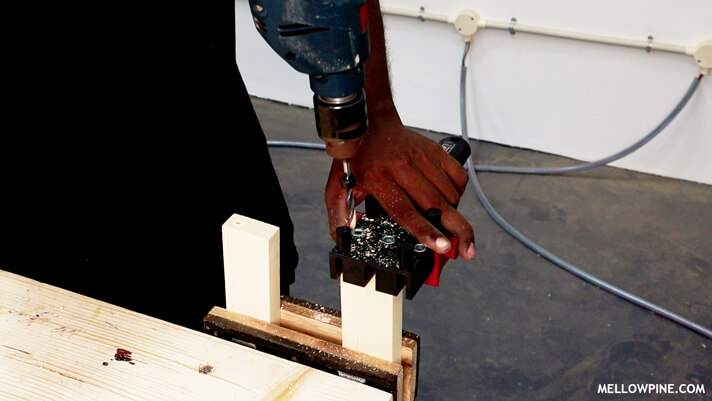
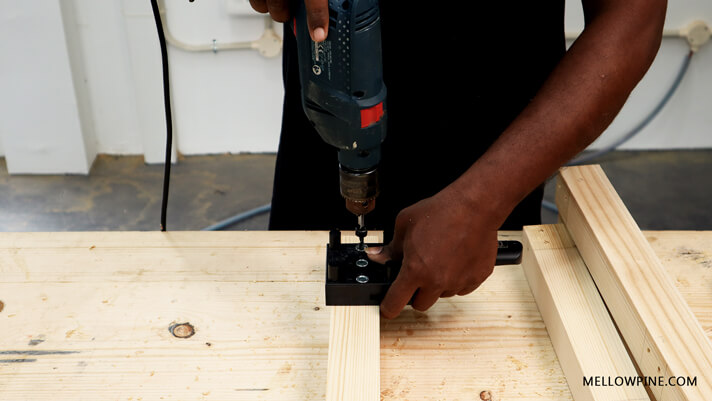
So we started with the bracing pieces for making the holes. We used the woodworking vise on the workbench to position the bracing pieces correctly for drilling.
Then we placed the dowel jig on each bracing piece and drilled two holes through the jig.
We placed a drill stop on the drill bit to control the depth of drilling.
Since we used a dowel pin of 1- ¼” length, we placed the drill stop such that the drill stops at half that length into the wood.
Ok now onto some woodworking theory.
The locations for drilling do not need to be highly precise when making the holes on the bracing pieces, they just have to be reasonably spaced on the end grain of the bracing piece.
But the location of the drill hole on the second piece which is to be joined to it has to align perfectly with the first drill hole.
So for this, we use a small pin-like device called a drill center.
The drill center fits inside the first drill hole and is used as a center punch to mark the drill location on the piece which is to be joined to the first piece.
In our case, the first piece is the bracing piece while the second piece is the leg piece.
You need a drill center to perfectly align two pieces for a dowel joint.
Now, only the particular bracing piece which was used to mark the drill location on a leg piece should be joined together.
So they need to be marked in pairs to identify them later for joining.
We marked the locations on each leg piece using bracing pieces and marked the pairs for identifying later.
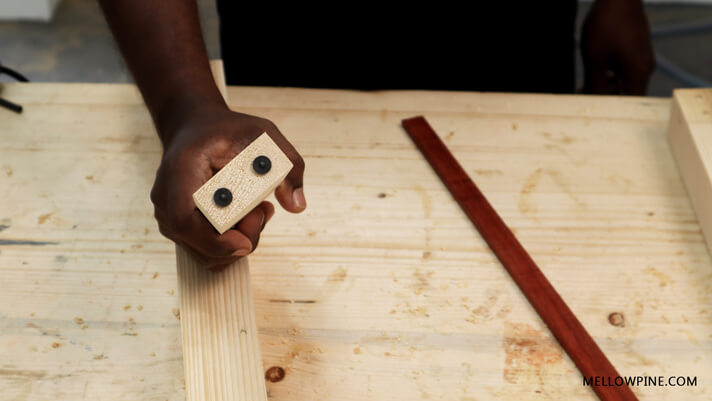
For aesthetic reasons, we marked the locations at a distance of ¼” from the edge on each leg piece using the drill center.
To make sure this ¼” measurement was uniform for all pieces, we used a ¼” thick piece of padauk we already had to act like a stop block for all the measurements.
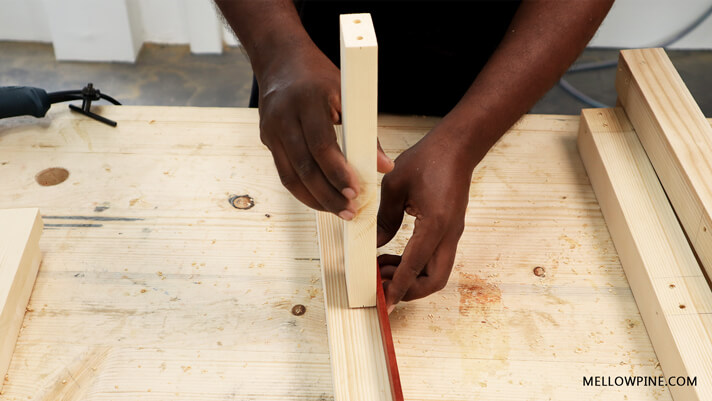
With three levels of bracing on one side of each leg piece and two dowel/drill holes at each level, there will be a total of 12 dowel holes on each leg piece in this build.
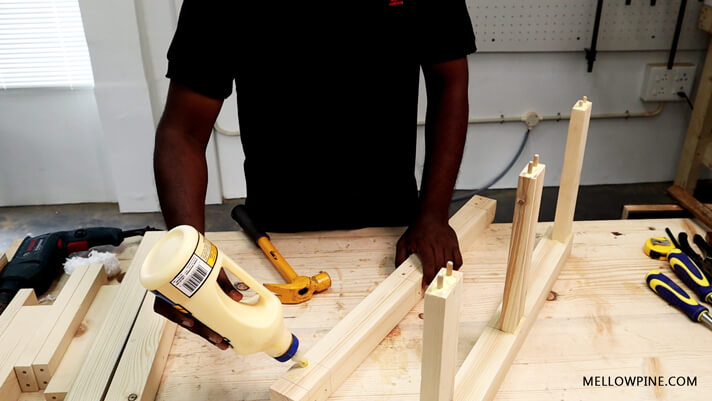
Step 7: The next step was making the dowel holes on the leg pieces at the locations marked using the centering jig.
So we used the same drill bit we used for the bracing pieces and drilled dowel holes in all the locations marked earlier.
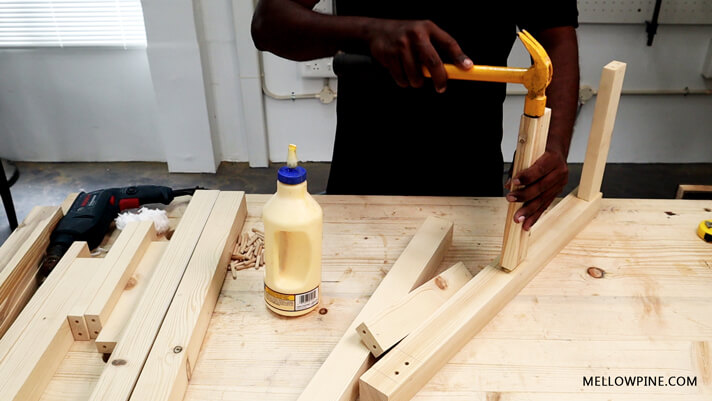
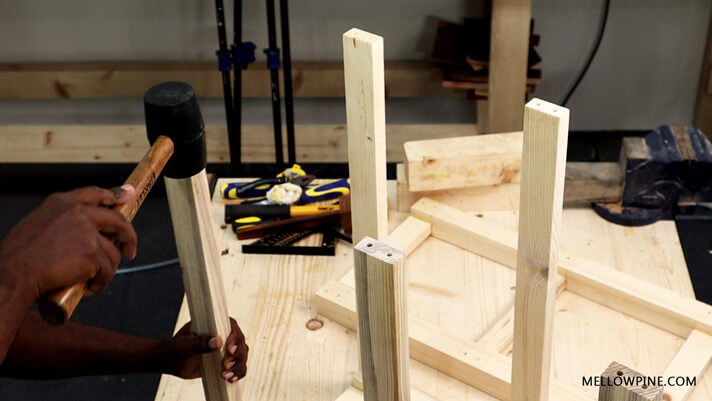
Then we filled each dowel hole with wood glue and hammered the correct sized dowel pins into the dowel hole..
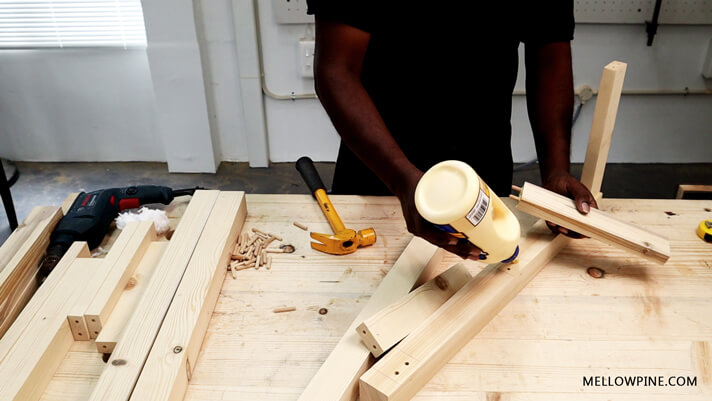
We first fitted the pin into the bracing piece and then used the hammer to push the dowel pin fixed on the bracing piece into the leg piece.
So with this step, a dowel joint for one bracing piece was complete.
When joining the bracing piece and the leg piece, we used the markings we did earlier to identify the right pairs for joining together.
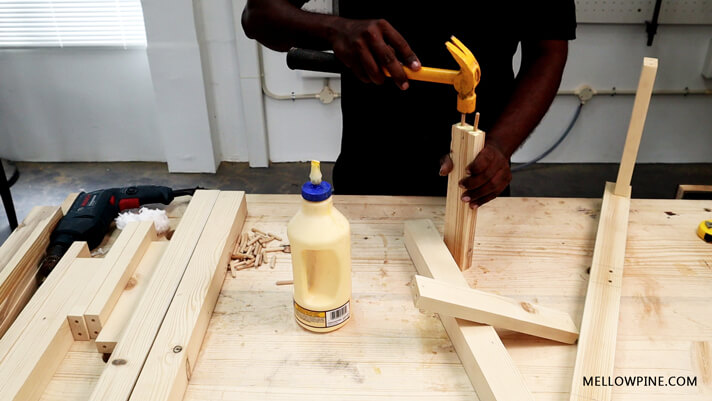
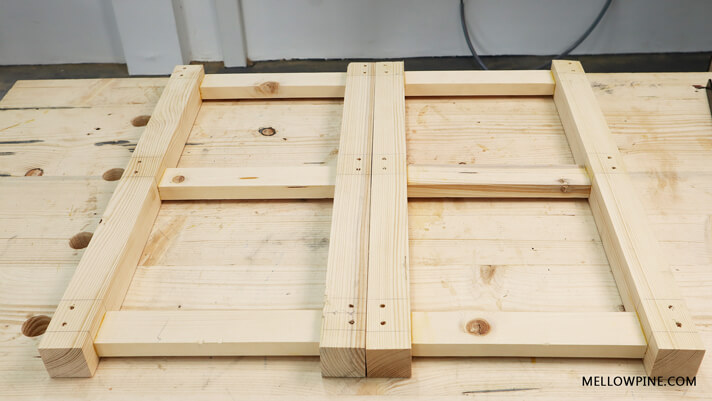
Step 8: Now, we fixed the three shorter bracing piece on each pair of legs of the kitchen cart using the dowel pins. So both sides of the kitchen cart were ready individually.
We clamped each of them using pipe clamps and left them to dry.
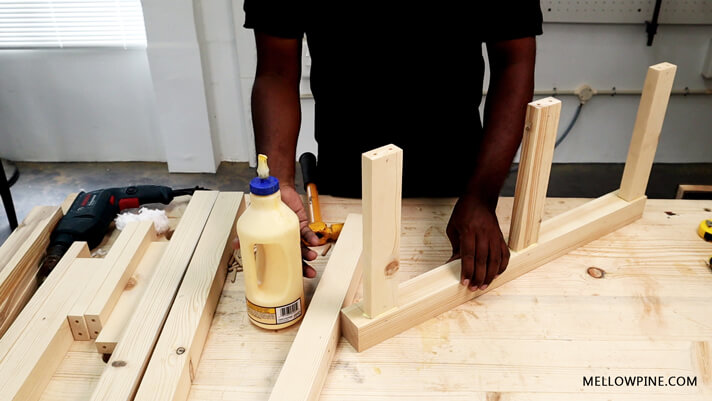
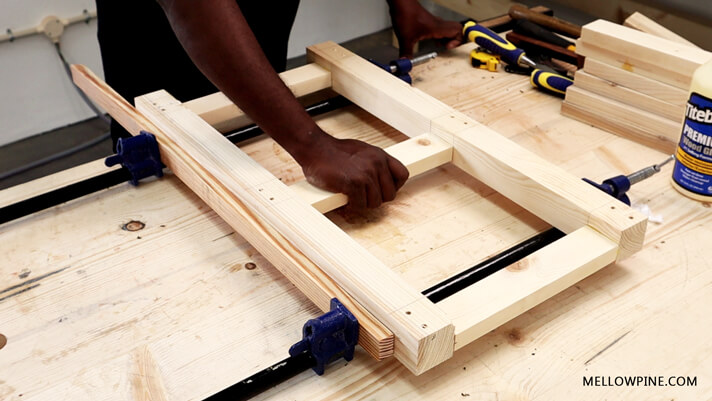
Note: when using pipe clamps or any clamp with a hard surface that touches the wood, use a flat scrap piece in between the clamp and the actual piece you’re making.
This is to avoid any pressure marks on the wood from the clamp. Pine is especially susceptible to marks.
Table Top
Step 9: The next step was making the tabletop panels.
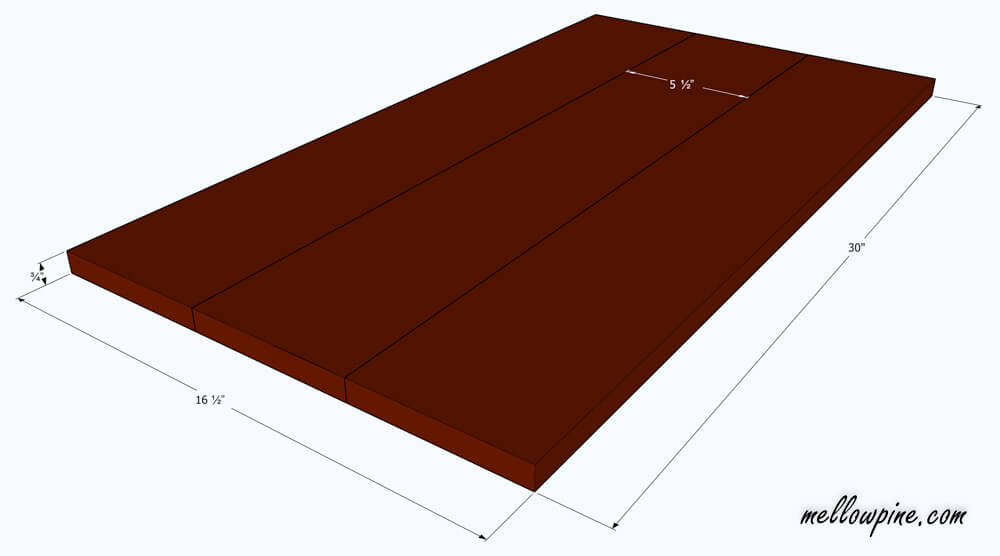
We used 1 x 6 boards (nominal size) for the tabletop.
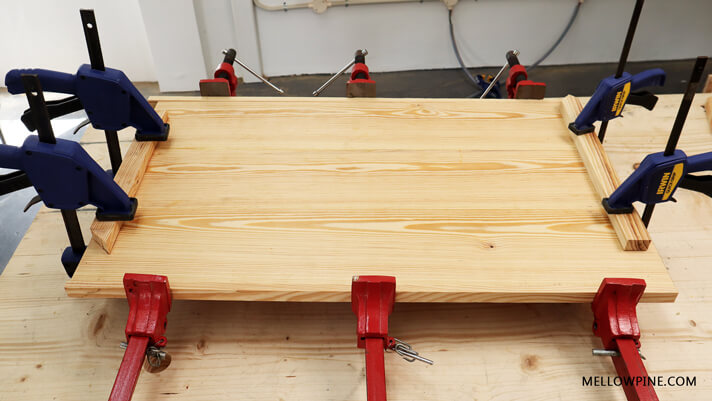
We cut out three 5-½ inch wide boards of 30-inch length for the top panel glue-up. A 1 x 6 board has an actual size of ¾” x 5-½” x 96” size.
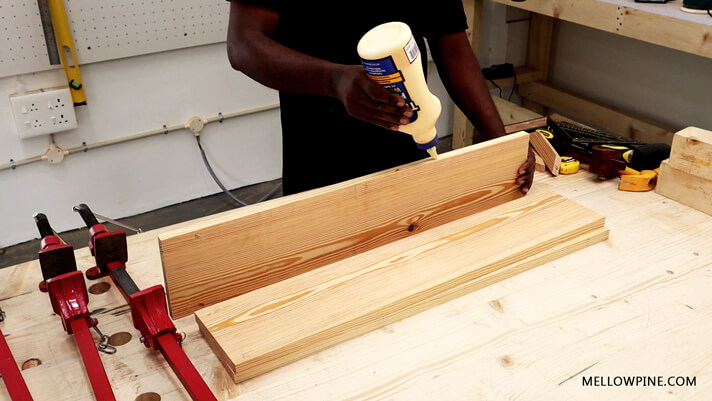
So we applied glue on the edge of each of the three board pieces and clamped it together for drying.
This will make the tabletop of our kitchen cart.
The width of the tabletop after glue up will be 18” ( 3 x 6 inches), but we need only a width of 16 inches so we’ll be cutting inches off after the glue up.
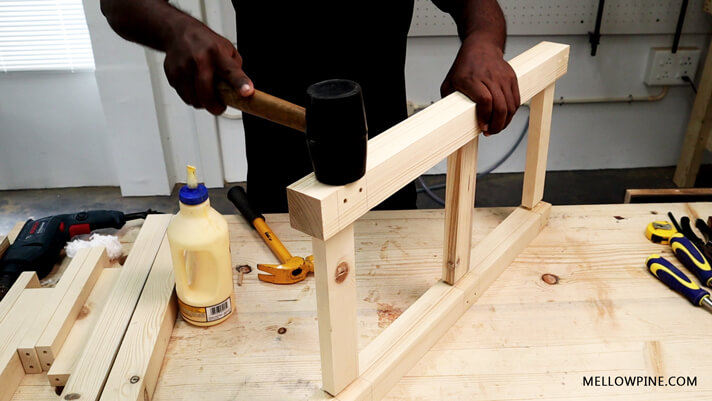
Step 10: We came the next day and our parts were all ready with glue fully cured. We first unclamped the leg pieces and they looked alright.
We now had to join the longer bracing pieces to the legs on both sides. Now, remember that we had already done the drilling of the dowel holes for the longer bracing pieces as well earlier. So we repeated the earlier process and used wood glue and dowel pins to join the longer bracing pieces to both legs.
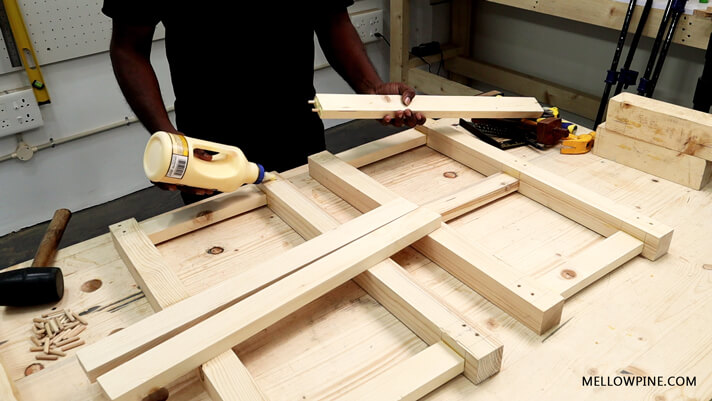
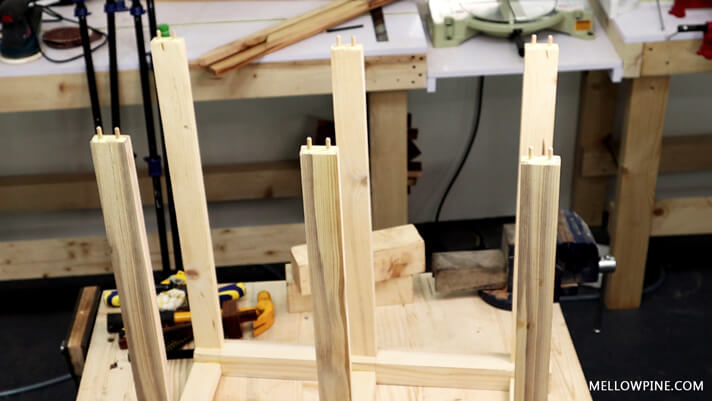

So we did a lot of gluing and hammering and finally clamped everything up using a combination of pipe clamps and quick grip clamps to fit it together as one piece.
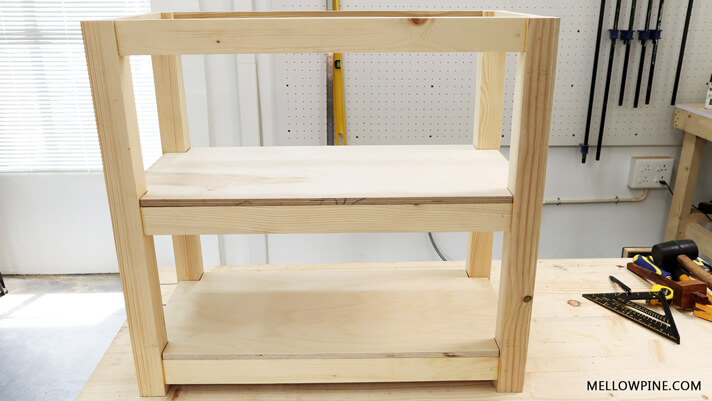
So with this step, the frame for the kitchen cart was ready.
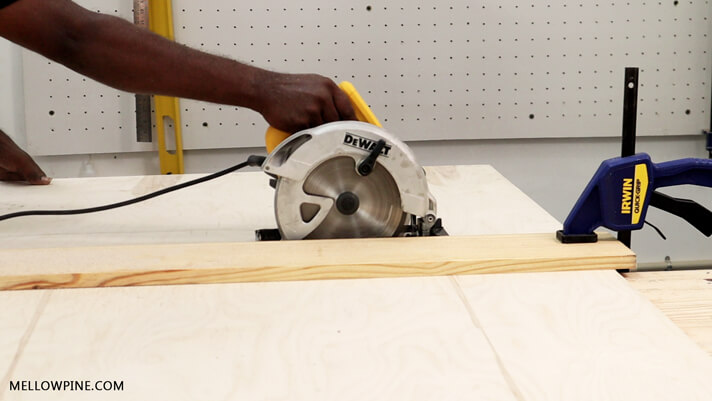
Step 11: Now the next step was making the plywood shelves for the DIY kitchen cart.
So we used ½ inch ply for the shelves. The size of the plywood shelf piece to be made was 27 ¼” x 13 ¼” according to the plan.
We used the circular saw to first bring the large plywood sheet (8 ft. x 4 ft.) to a manageable size and then did the final sizing on the table saw. This can be done using a circular saw as well, quite easily.
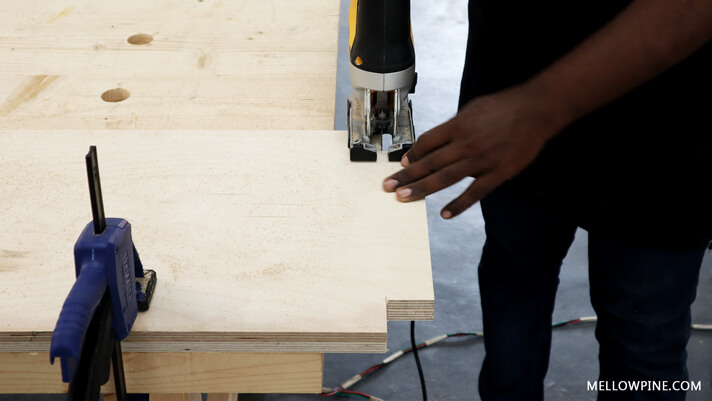
Next we had to cut the slots for each of the four legs on the plywood shelf piece.
We cut out a 1-½” square on each corner of the plywood piece using a jig saw.
You might have noticed that I stacked the two sheets vertically and cut them both in one go.
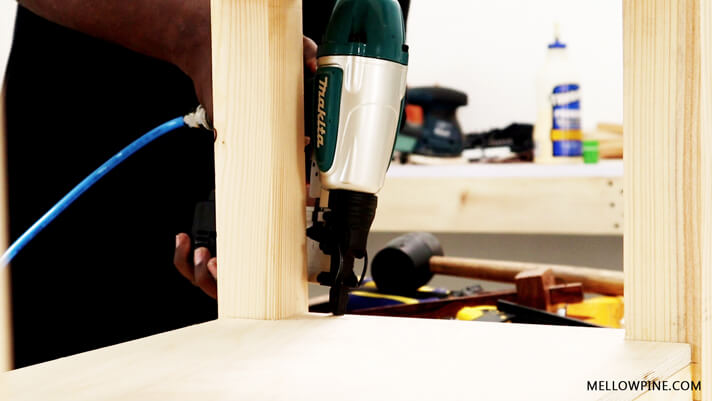
After this, we tried fitting it into the frame we made in the earlier step. It fit quite nicely.
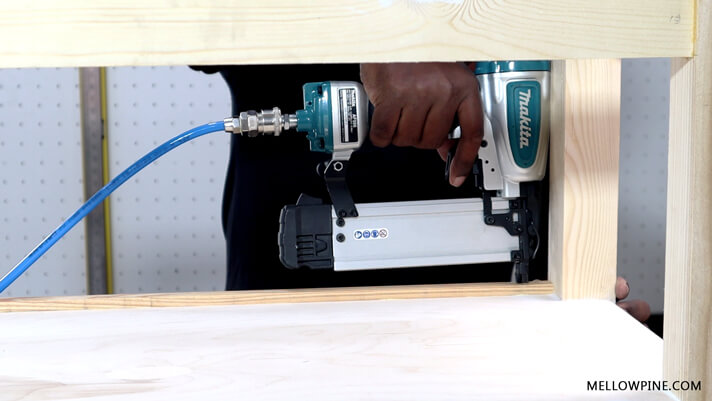
Once the dry fit was successful, we nailed each of the plywood shelves to each of the bracing pieces using the pneumatic nailer.
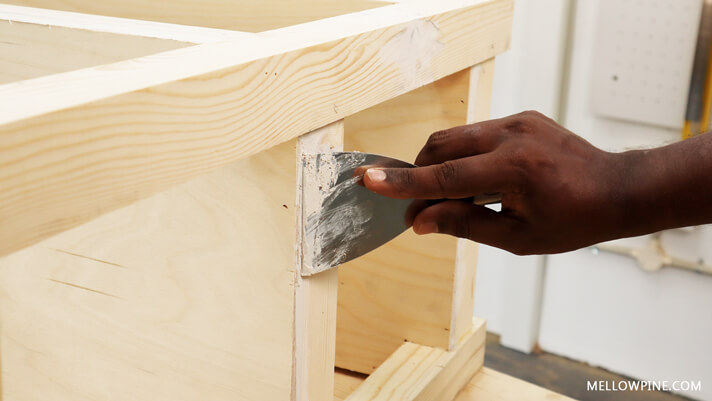
Step 12: Since we were planning on painting the entire frame (except the tabletop), we applied wood filler on the edges of the plywood shelves using a putty knife.
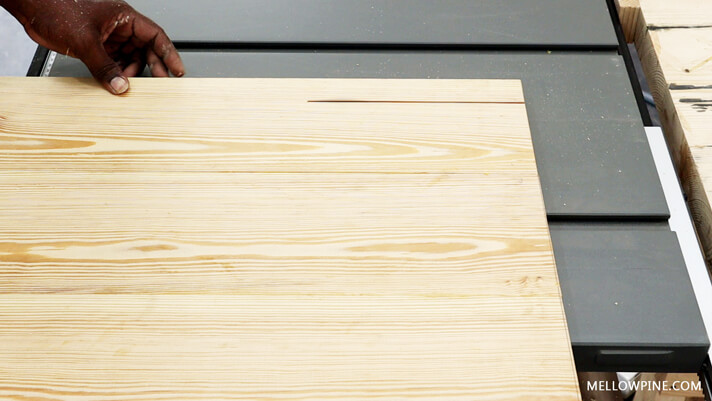
Step 13: Now at this point, our table top panel was ready after curing.
So we unclamped it and as I mentioned at the end of step 9, cut off 2 inches from the glued up panel to make it 16 inches wide and 30 inches long.
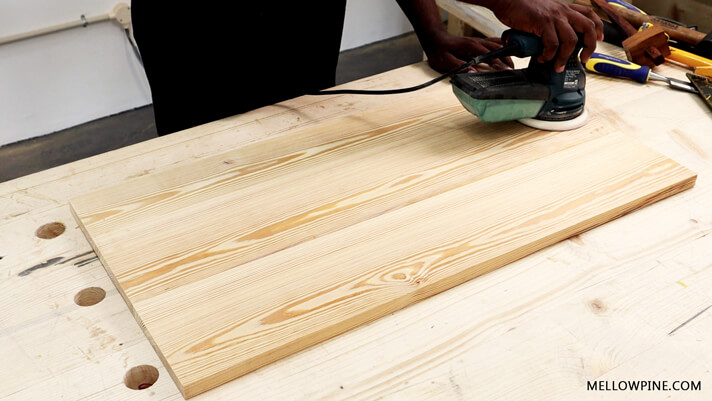
We then sanded it all the way from 120 grit to 220 grit.
Wood Burning
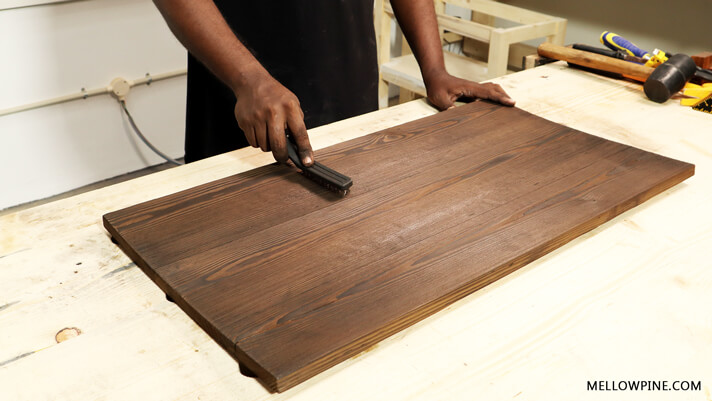
Step 14: The next step was the wood burning of the table top panel.
We used a flame torch to evenly burn the wood until it was charcoal black. You can vary the amount of heat and time of burning to achieve the desired colour.
We wanted a really dark top so we really gave it some time under the flame.
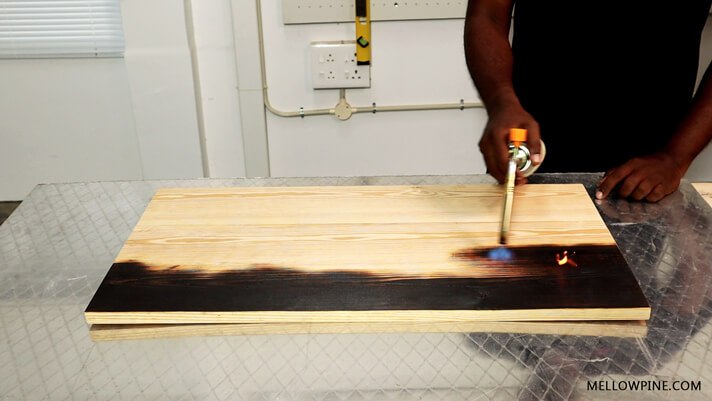
We always place the pieces to be burned on an aluminum sheet to avoid the workbench from getting burned.
You can also do the wood-burning outside your shop on the ground as well.
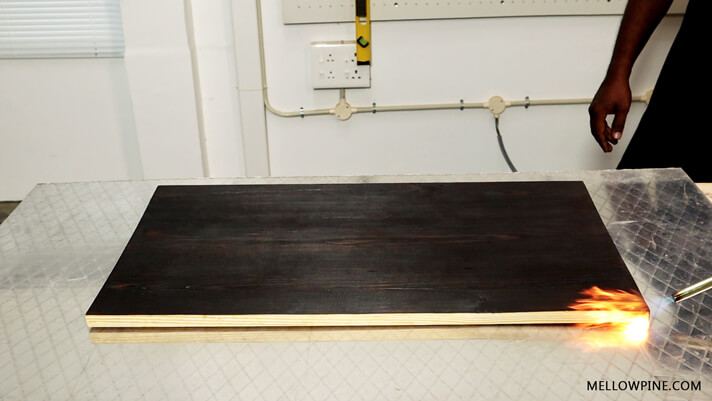
As you can see the wood warped on the ends after the burning due to the water inside evaporating.
You can reduce the warping a lot by using kiln-dried lumber.
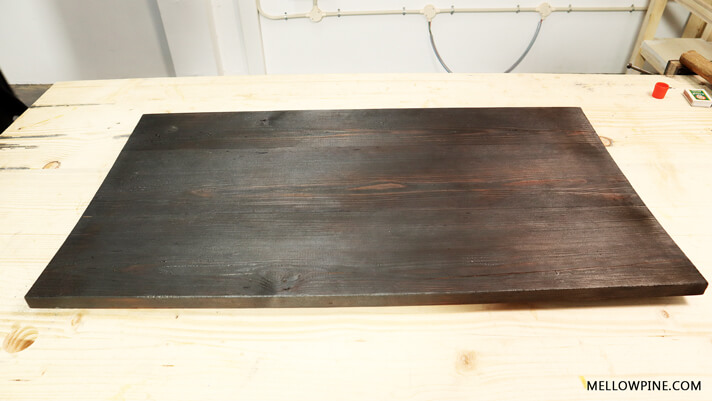
After the burning, we used a wire brush to brush the top panel to reveal the final finish after the wood-burning.
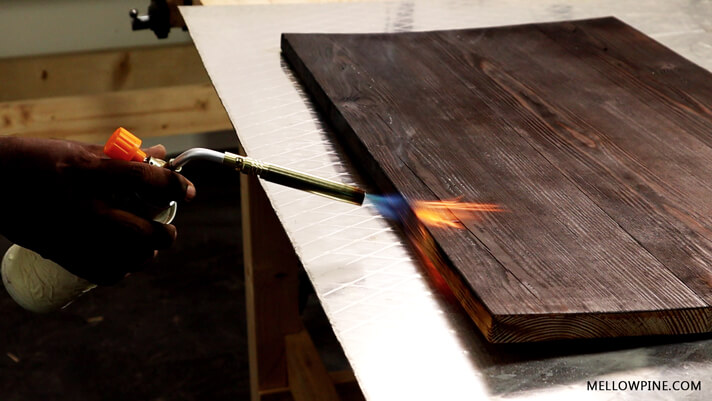
We clamped down the piece on the sides again after the wood-burning to correct the warping.
The wood cracked on the sides as expected. We filled it up using sawdust and did burn it again using the flame torch to bring it to a similar look as the rest of the piece.
Step 15: The next step was fixing a small guard piece on the edges of the plywood shelves to prevent things from rolling off the shelf.
We used four pieces of size- 24 ¼” x ½” x ¼” for this purpose and fixed them to the shelf using our pneumatic nailer.
Finishing
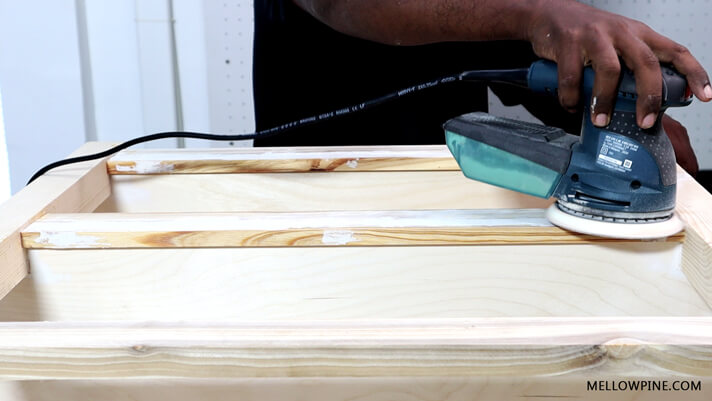
Step 16: At this point, the wood filler we applied had dried, so we sanded it down using our random orbital sander.
Painting
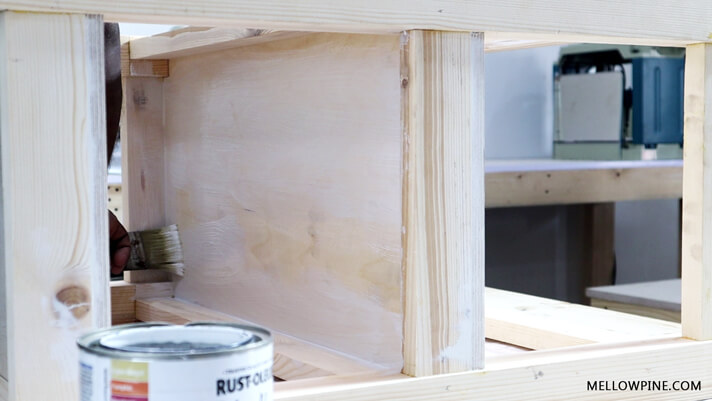
We used Rustoleum Chalked paint for finishing the frame of the kitchen cart.
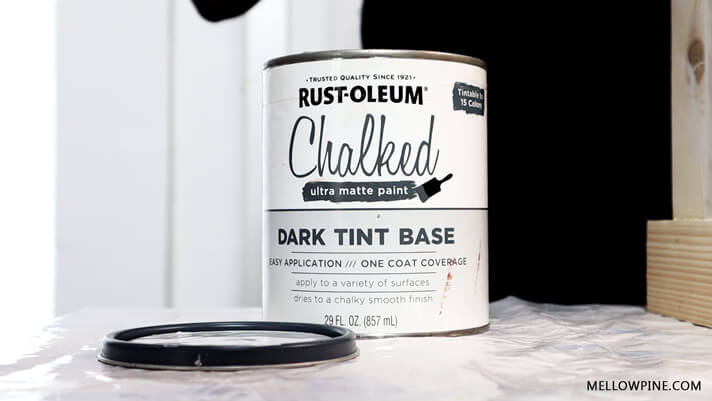
We painted it using a paint brush for the first coat and in the second coat applied the same paint using a foam roller.
If you’re using Chalk paint, you do not need to use a wood primer.
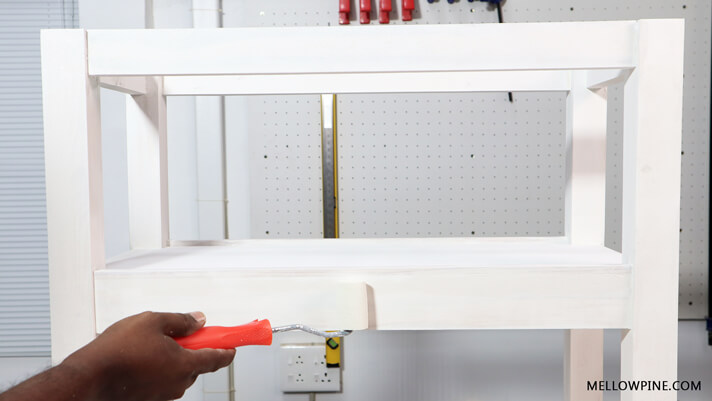
We did hand sand it lightly before applying the second coat of paint. Now we left the frame for a day for the paint to dry.
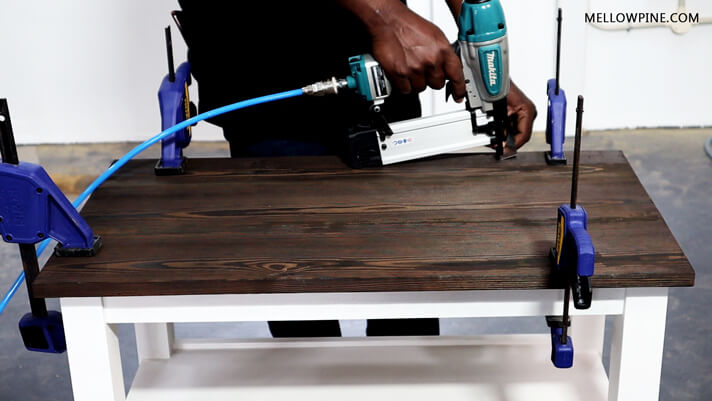
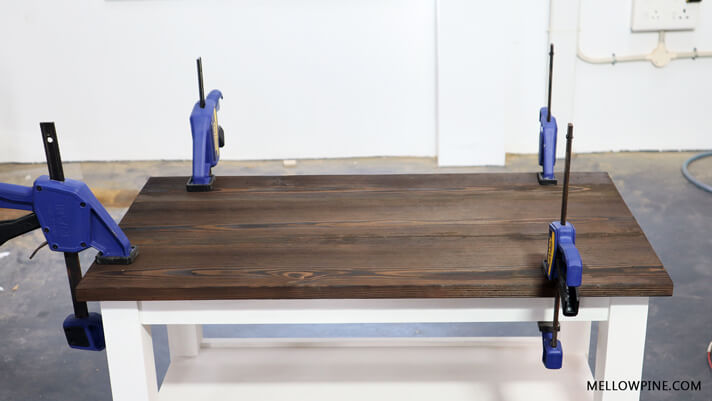
Step 17: Ok. Now the paint had all dried and we had to fix the top panel to the frame.
We centered it carefully after measuring with tape and used wood glue to fix the tabletop to the frame.
After placing the panel top, we nailed the tabletop to the frame to hold it in place until the glue cured.
Step 18: Now, we applied two coats of water-based PU (Varathane) on the top to seal the tabletop.
Sand lightly after the first coat using a 320 grit sandpaper for getting a really smooth finish.
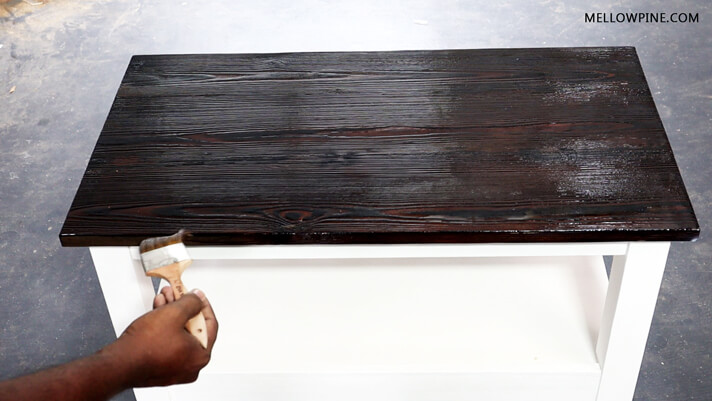
Note: It is essential to apply some form of protective coating on top of the wood burned surface to prevent the wood ash from coming off the surface every time you touch it.
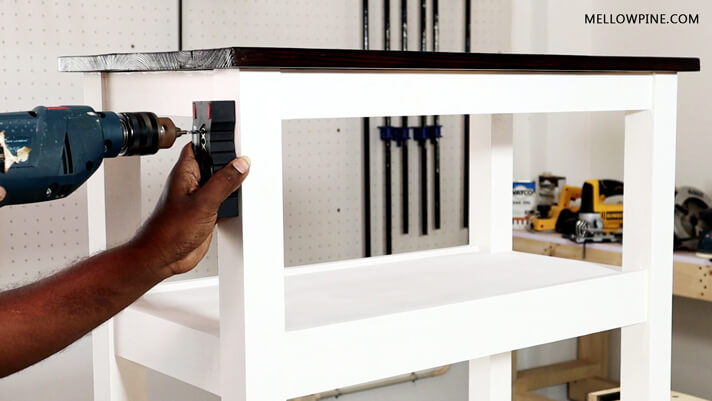
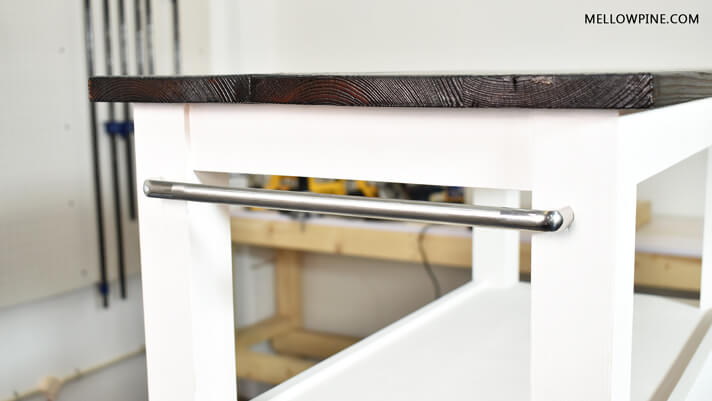
Step 19: The next step was fixing the towel bar and wheels for the DIY Kitchen Cart.
Now, it’s best you buy the towel bar first and size the width of the cart to match the towel bar. We did just that.
We measured and centered the towel bar on the side of the frame before fixing it using screws.

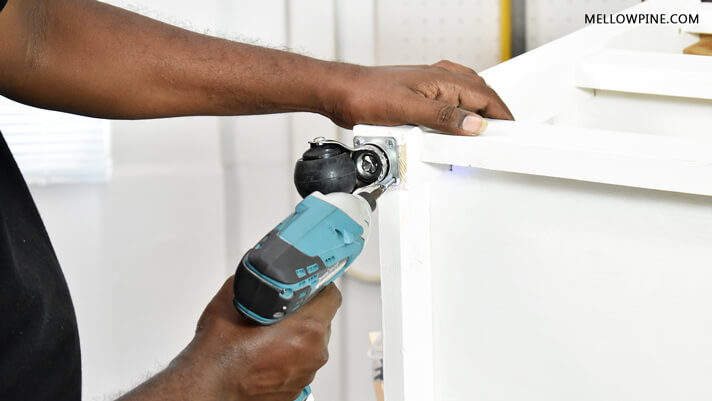
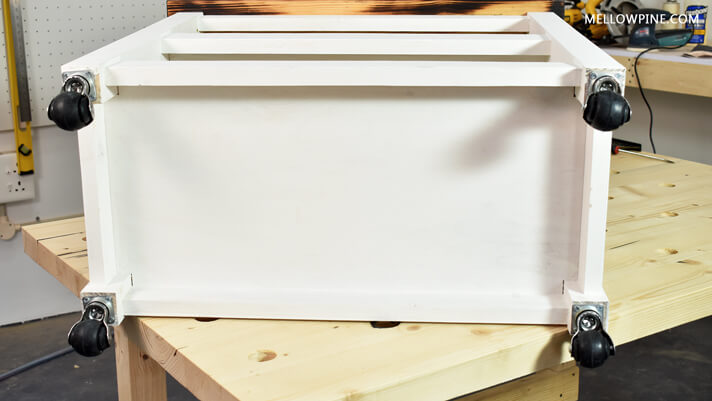
As the last step, we fixed four caster wheels to the bottom of the legs of the kitchen cart.
Make sure to use caster wheels with a locking mechanism to prevent the cart from rolling off.
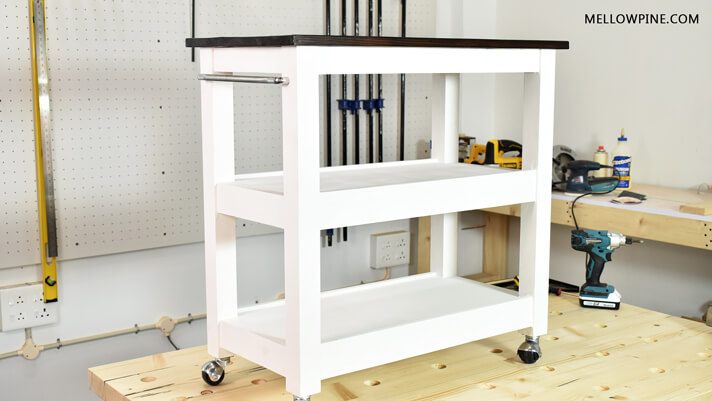
And, we’re done! Here’s the kitchen cart we will be using in our kitchen and also for outdoor barbecues.
If you liked this build, you might want to save the pin below to your DIY/Woodworking board.
Check out some of the other DIY projects you might like:
- DIY Geometric Wood Wall Art
- DIY Wood Coasters and Coaster Holder
- DIY Column Bookshelf
- DIY Spice Rack for Kitchen
Another Intermediate DIY build for you to try:
DIY Kitchen Cart on Wheels