


Hey guys this is Susan. Today I’m back with a new project.
I saw a really great coaster on Etsy and wanted to make something inspired by that for our home.
I wanted it to be really classy but also attractive.
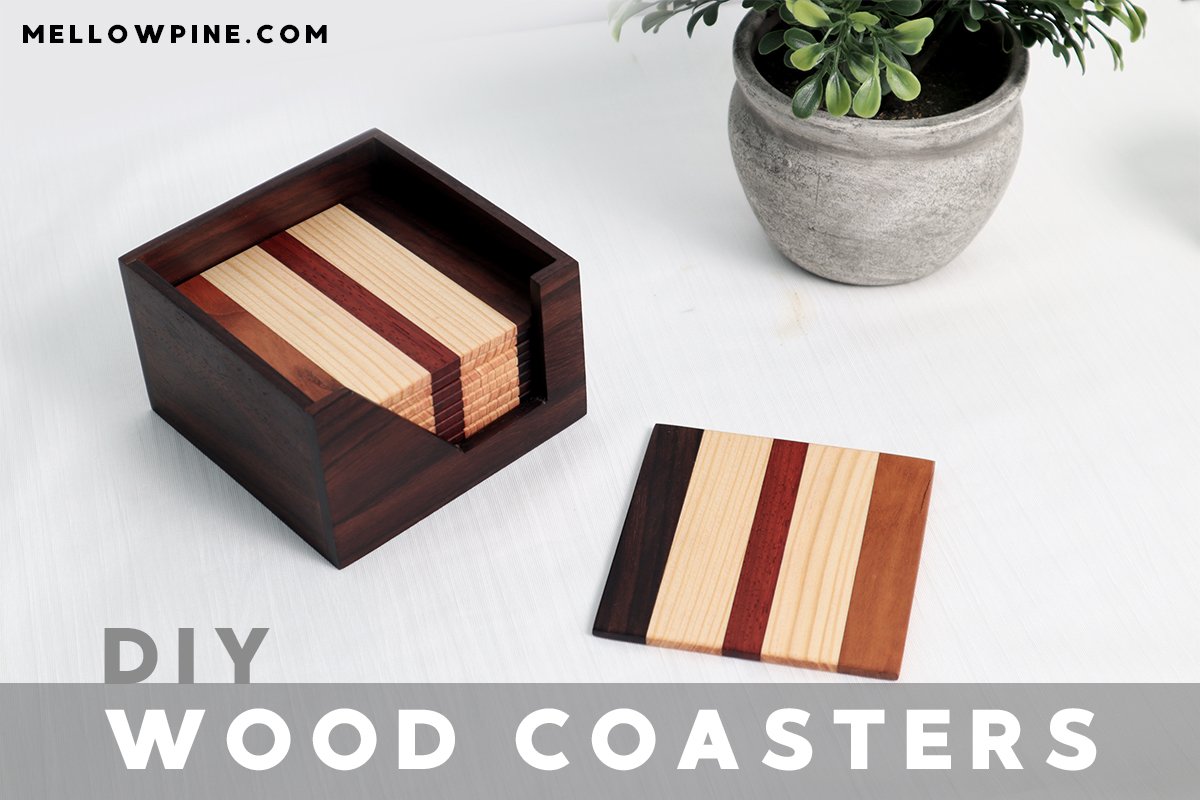
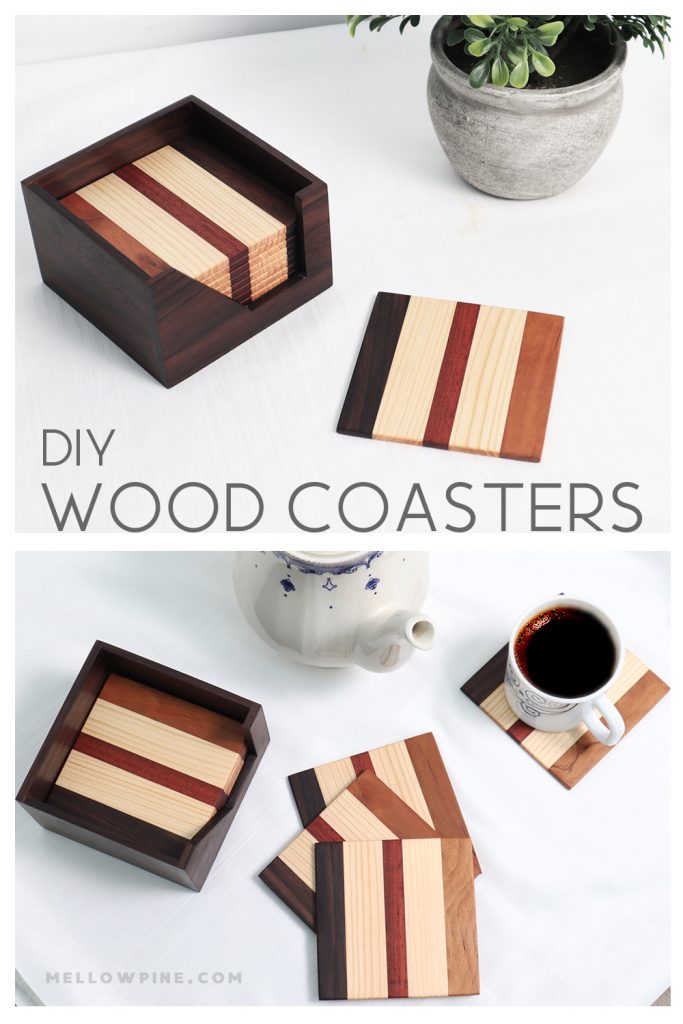
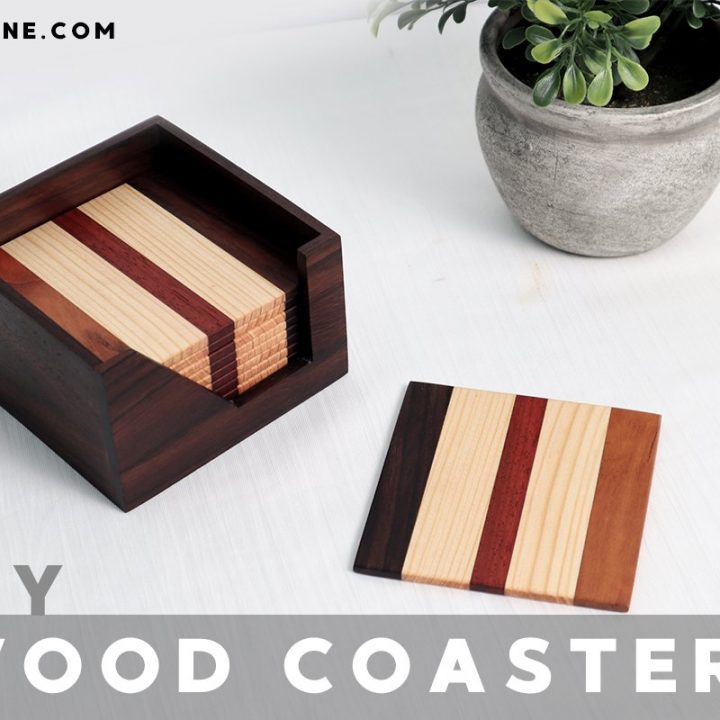
So I re-designed the widths and colors and went on to make a set of coasters. I also wanted a nice holder as well to store the coasters in.
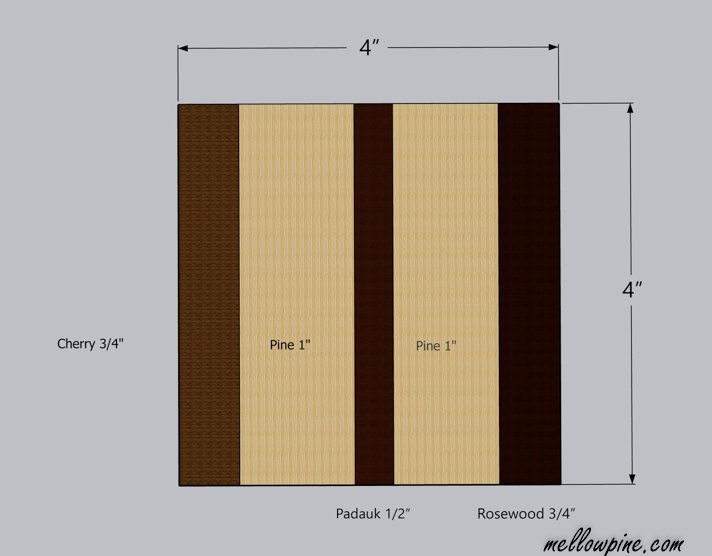
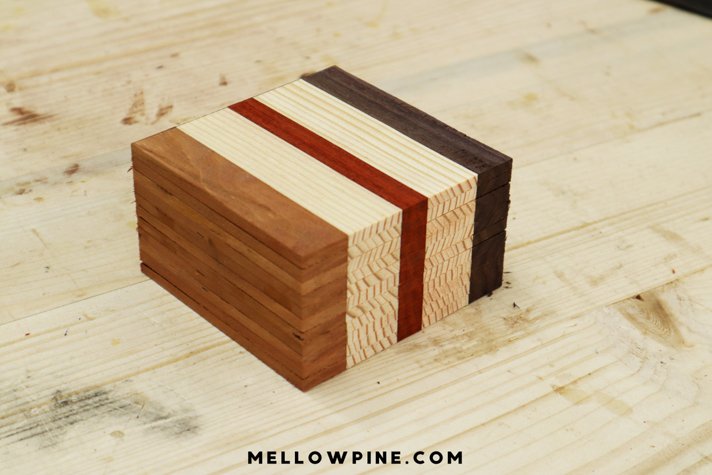
To build this coaster, we used 4 different types of wood.
Most of the wood used was just pieces of wood lying around in our woodshop. We used Pine, Padauk, cherry, and rosewood.
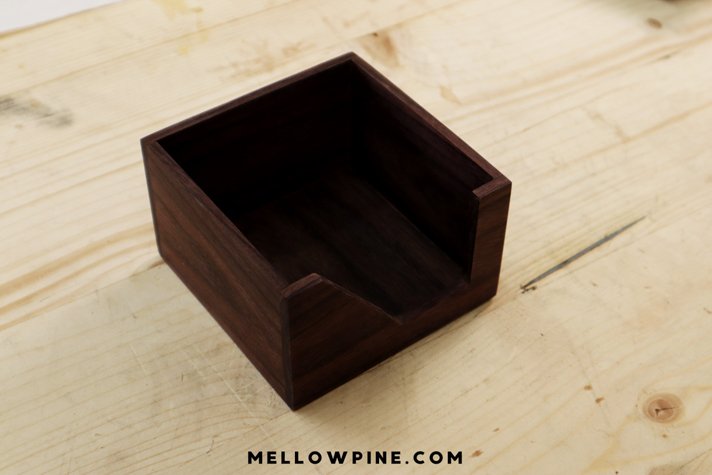
The coaster holder was made entirely out of rosewood.
You can use walnut wood instead of rosewood to get a similar look.
It took us just 2 hours for the whole project excluding the time for the glue to dry.
So this project costs almost nothing if you have the scrap wood lying around.
The build video for this project is down below for you to watch.
DIY Wood Coasters and Coaster Holder- Build Video

We post videos of all our DIY projects. If you haven’t subscribed to our channel yet, please do- Subscribe to Mellowpine YouTube Channel
MellowPine is reader-supported. When you buy through links on my site, I may earn an affiliate commission at no extra cost to you.
Plan For Wood Coaster and Coaster Holder
How To Build The Wood Coaster
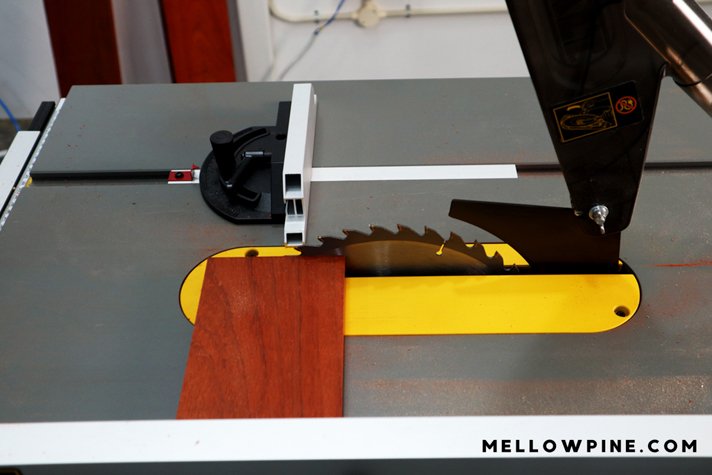
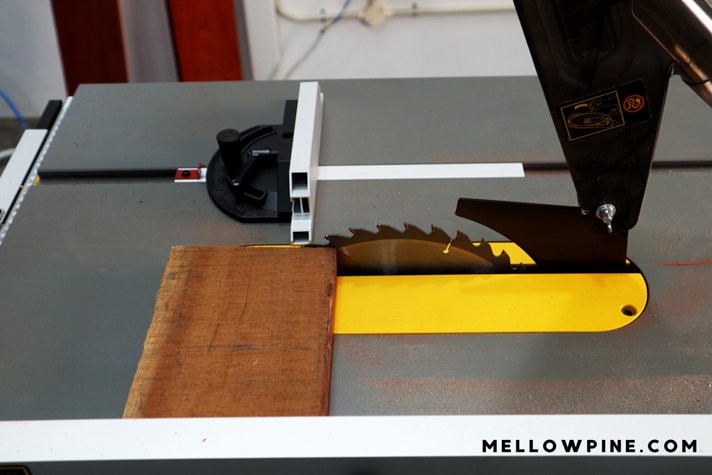
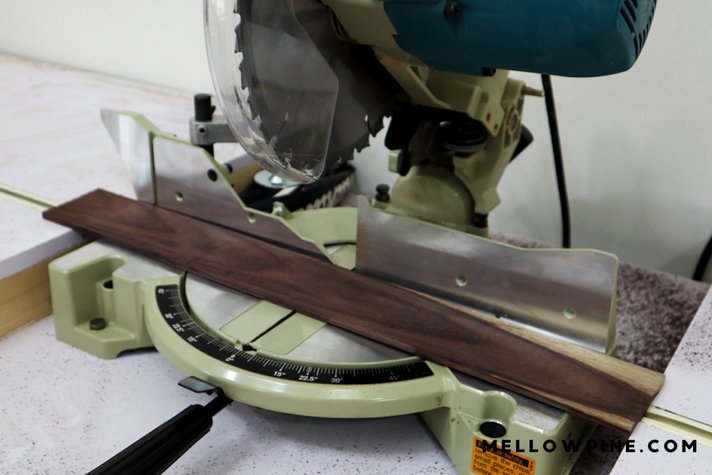
Step 1: The first step in building the coaster was taking a 1-inch thick padauk board and cutting out a 4 ¼ inch wide piece from it using the table saw.
We made it a one-quarter inch more than 4 inches to account for the loss in thickness while planing the wood.
Step 2: Next we cut down a shorter piece which was 7 inches long from the piece of padauk we got from the last step.
Note: So the goal here is to get all the wood down to 4 inches in width (after planing) and almost the same length.
The thickness of each wood piece at the time of glue up is what determines how the face of the coaster will finally look.
Step 3: Then we took a 4 1/4 inch wide board of cherry wood and cut out a 7-inch long piece.
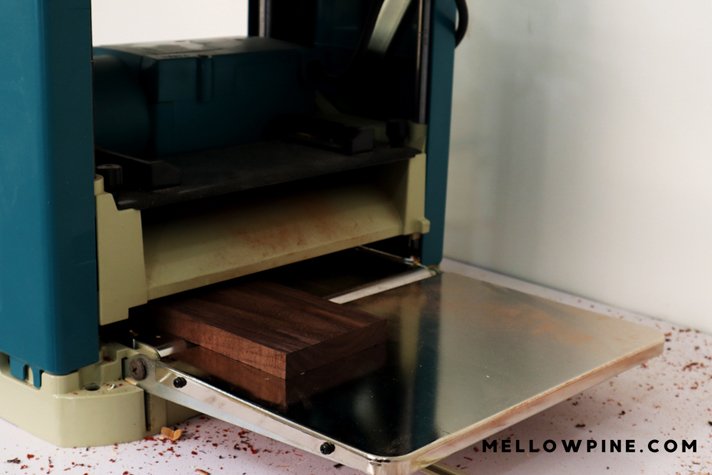
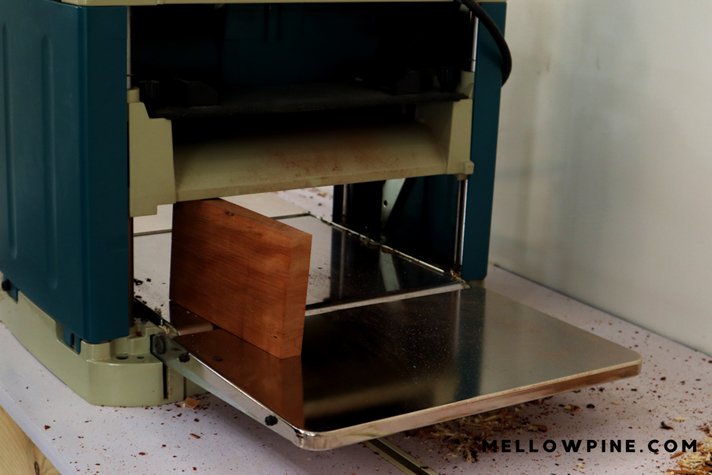
Step 4: After this, we planed the scrap piece of rosewood to make it ¾ inch thick using the planer. You can use dark walnut instead if you want.
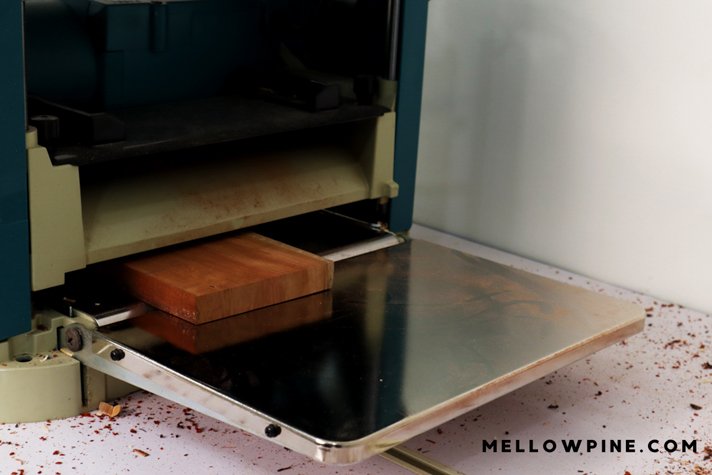
Step 5: Next, For the cherry board we made it ¾ inch thick after planing.
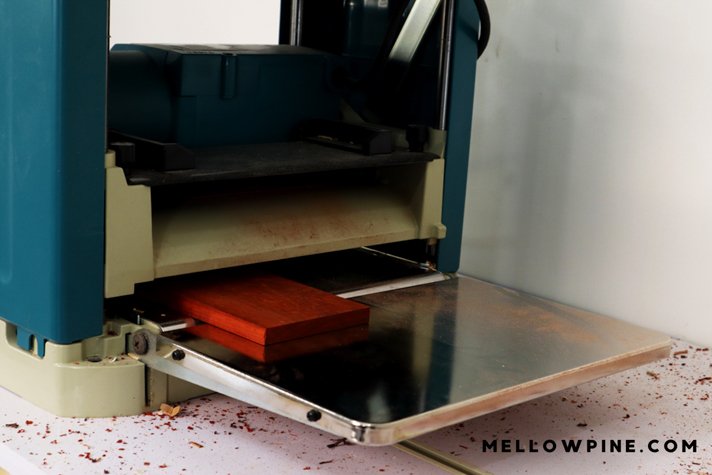
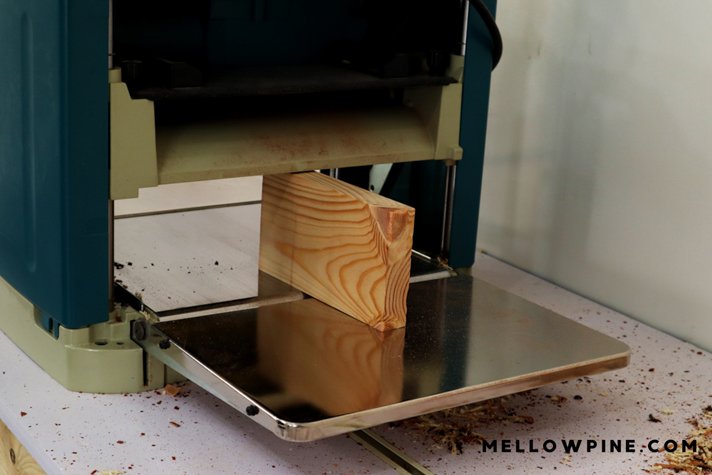
Step 6: So next plane the padauk board to make it ½ inch thick. The padauk was the thinnest as we wanted just a tiny splash of red in the coaster.
Step 7: We planed two pinewood pieces to make them both 1 inch thick.
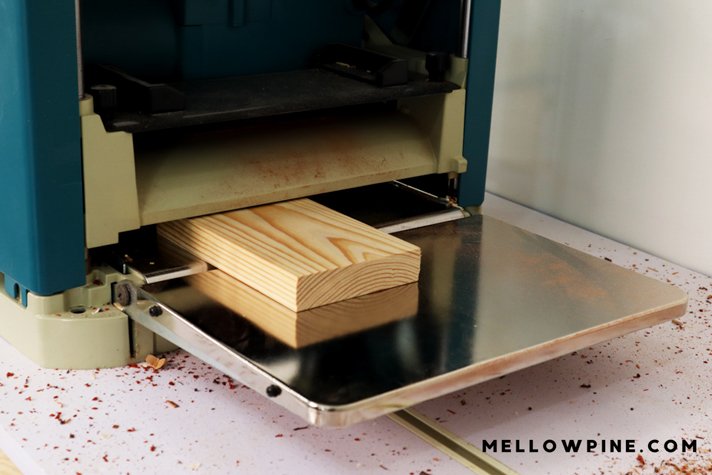
Step 8: After we planed the face of the pieces, we planed the edges as well.
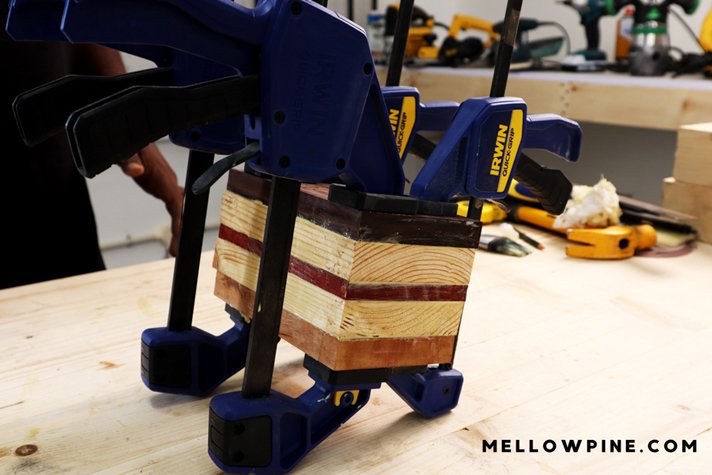
Step 9: So here we have all the 5 pieces stacked up in the order we want on the coaster.
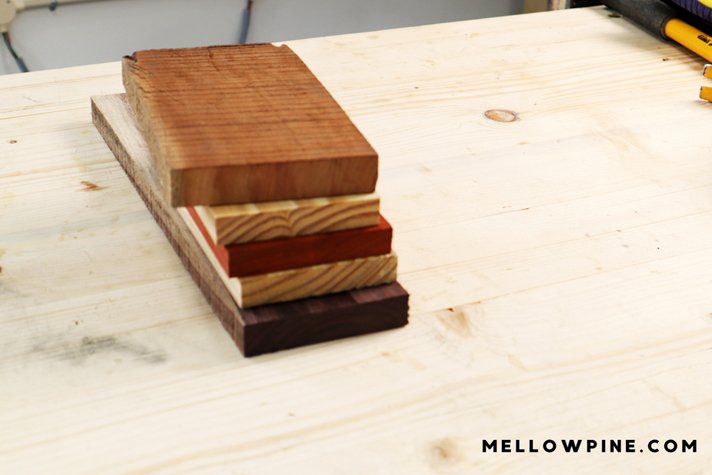
Step 10: Next we went for the glue up. We applied wood glue on all the pieces and clamped them together using wood clamps. I actually love the Padauk because it spices up the whole thing.
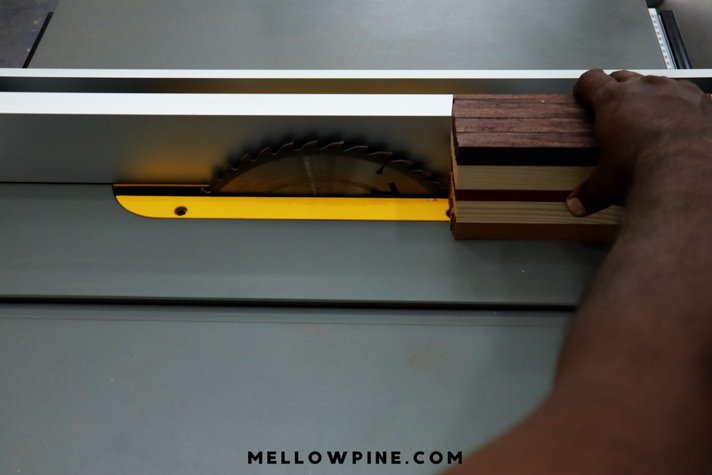
Step 11: After the glue dried up, we went on to the fun part of slicing the coasters. We planed the piece to remove any minor level issues that happened during the glue up before doing the slicing on the table saw.
Step 12: We used the table saw to slice pieces of coasters with a ¼ inch thickness. After we sliced up all the pieces, we planed both the faces before doing the final cutting.
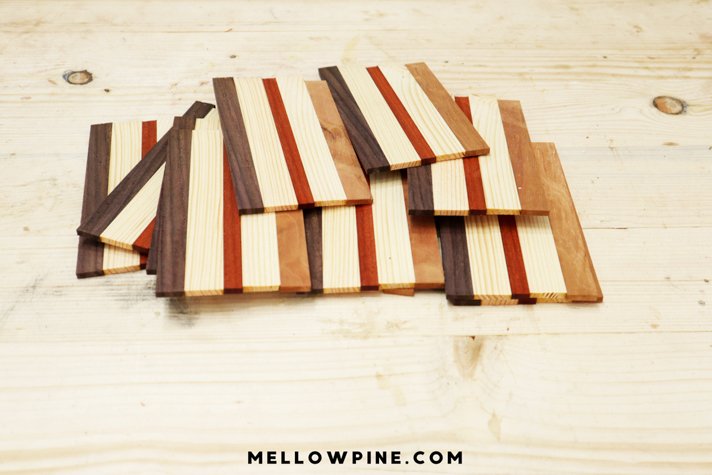
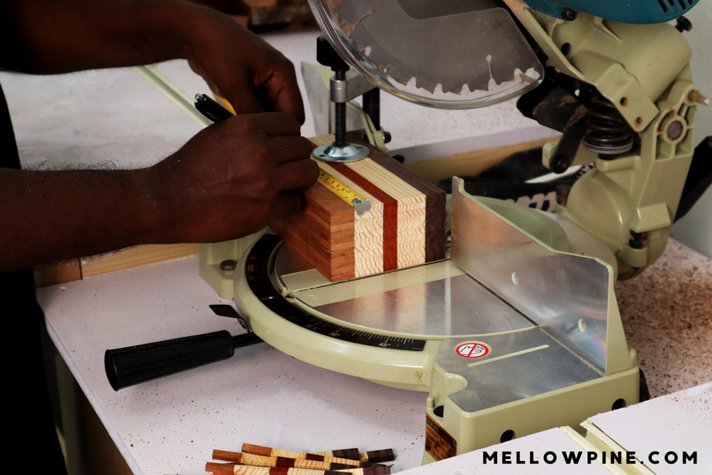
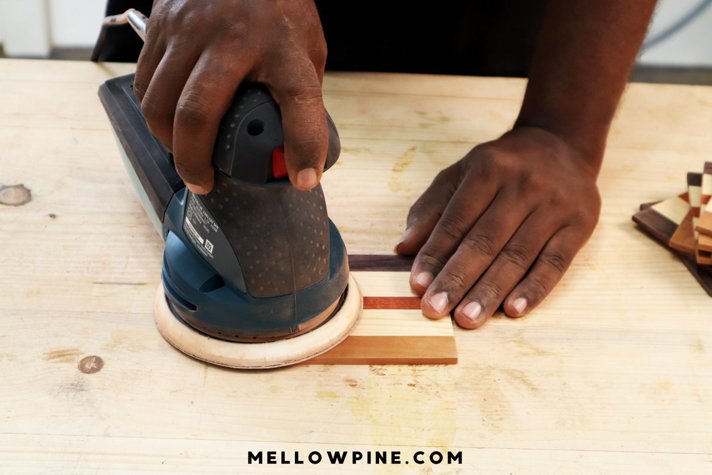
Step 13: So, using the miter saw, we stacked up all the pieces and cut the excess wood to finally get 4 inch by 4 inch square coasters. After this we did a final sanding up to 320 grit.
Step 14: Now we sanded the coasters with 120 grit sandpaper and went all the way up to 320 grit. Then we hand-sanded the edges to make them round.
Tip: Always round out the edges if the furniture you’re making is going to be in contact with people.
Step 15: Now that the pieces were ready, we finished the coasters with homemade paste wax.
If you don’t want to make paste wax, you can get a great result with rubio monocoat as well.
Tip: I made the homemade paste wax using boiled linseed oil and natural bee wax. I made it by boiling linseed oil and beeswax in a 3:1 ratio at home. I went with a homemade food-safe finish for the coasters.
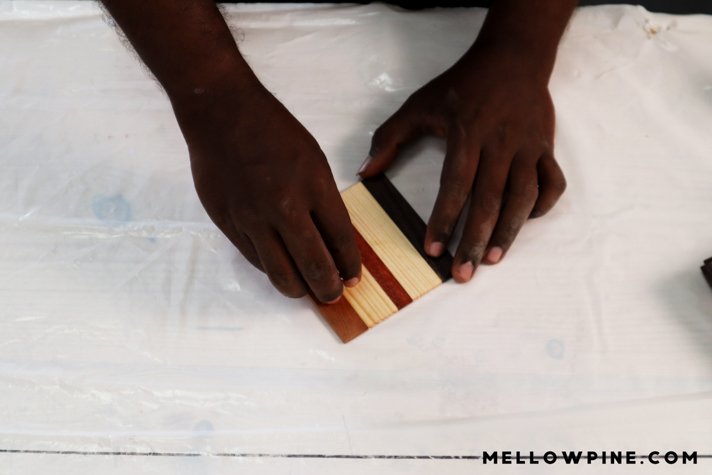
Step 16: So after applying the wax, we buffed it using a rag multiple times to get the shine. I would say the finish has a moderate shine to it and we really liked it. Once the wax was buffed, the colors of the wood started popping.
How To Make Wood Coaster Holder
Ok, now we need to make the DIY wood coaster holder. So, after we left the coasters with the glue to dry, we started working on the coaster holder.
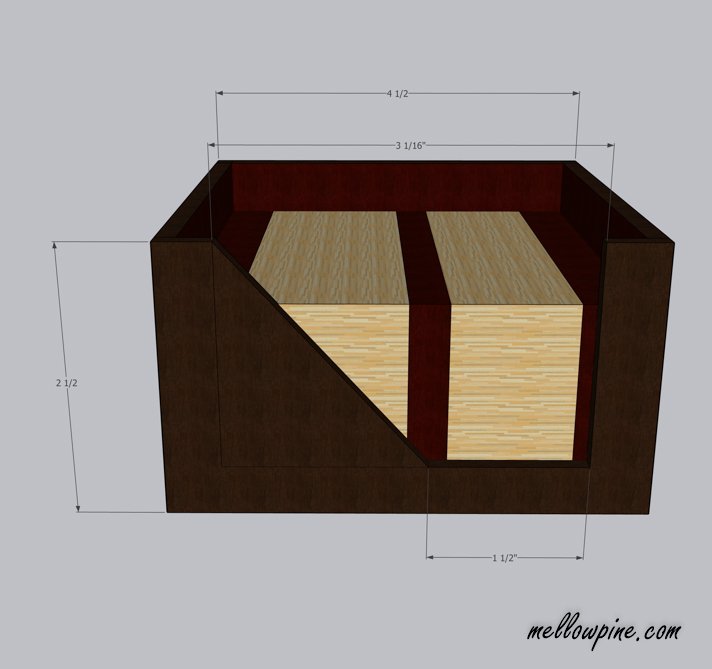
We need only rosewood for making this holder. You will get a similar look if you replace rosewood with dark walnut as well.
Step 1: For this, we planed a piece of rosewood until it was ¼ inch thick on the planer. Then we took another ½ inch thick piece of rosewood and resawed it to get two pieces of ¼ inch thick rosewood.
Finally, after all the planing and cutting, we ended up with 2 square pieces having 4 ½ inch length and another 2 square pieces with 4-inch length. And the last piece for the holder is a 4 ½ inch square piece for the base.
Are you new to using a table saw and wondering how to use a table saw safely? Check out this comprehensive guide on using a table saw safely- How to Safely Rip a 2×4 With a Table Saw.
Step 2: So once that was done, we sanded down the pieces of the holder from 120 grit all the way to 320 grit.
Tip: Always sand in incremental steps. That goes from 120 to 180 to 220 to 320. Rather than going straight from 120 to 320. This will give a much better finish.
Step 3: Next part was cutting out the front face of the holder.
We marked the pattern on the facepiece and cut it out using a jigsaw. We had to be really careful not to break the piece as it was already really thin.
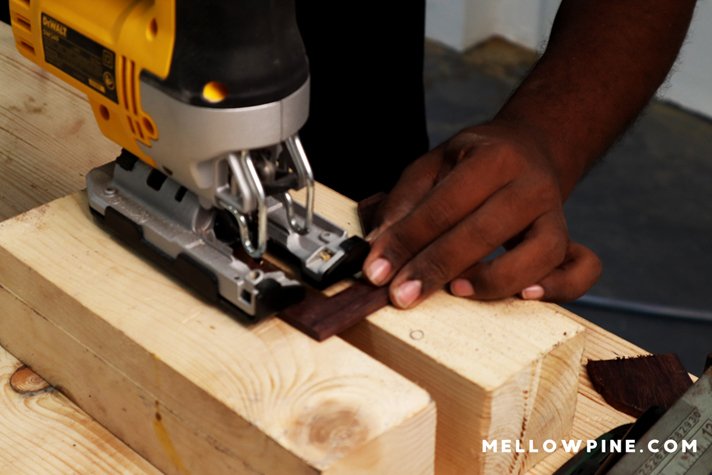
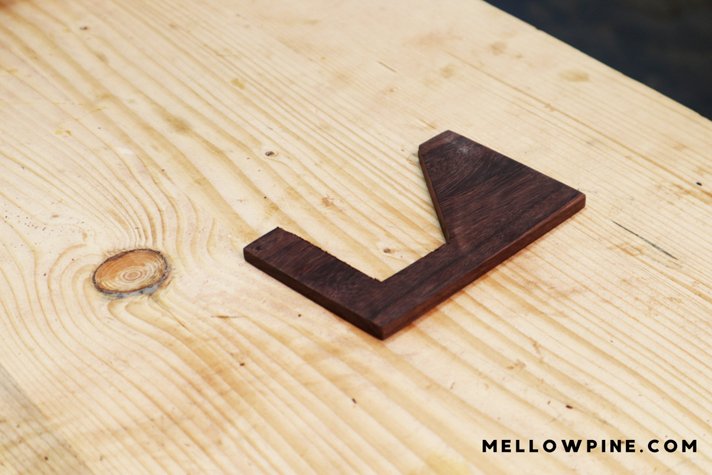
Step 4: Once that was done, we hand sanded the facepiece to round the edges.
Step 5: After this we went for the glue up.
Truth be told, it was a really tough job to glue up such thin pieces together. So we used 2 blocks of wood for support and clamped it down carefully.
Step 6: After the glue in the holder dried up, we unclamped it. So now that the glue-up was done ok, the difficult part of the project was over.
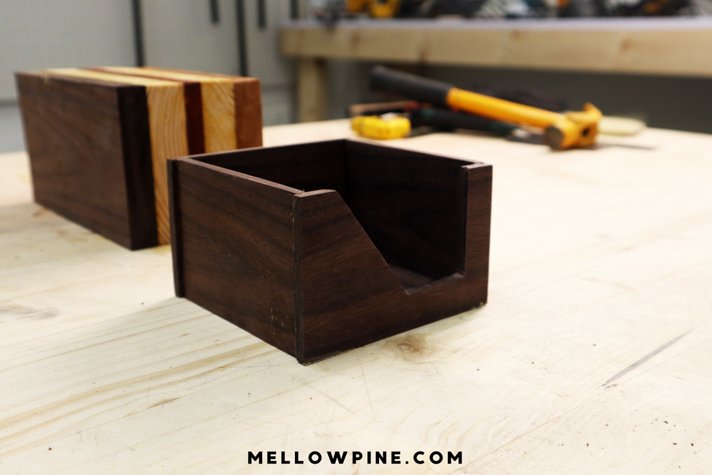
Step 7: We did a final hand sanding of the coaster holder to smooth out the rough edges and applied the same homemade paste wax finish on the holder as well.
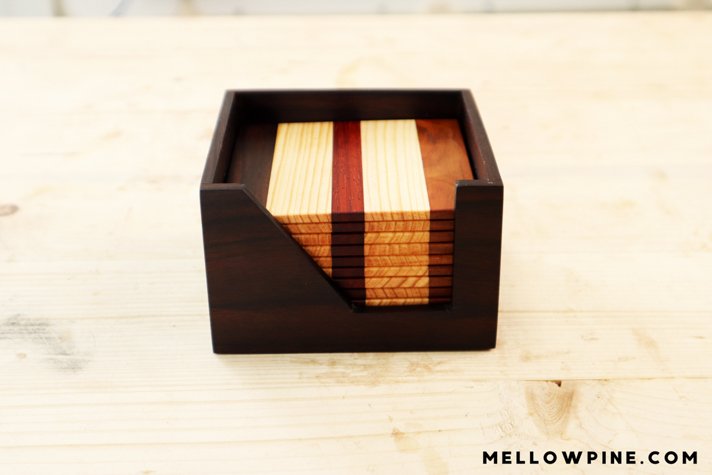
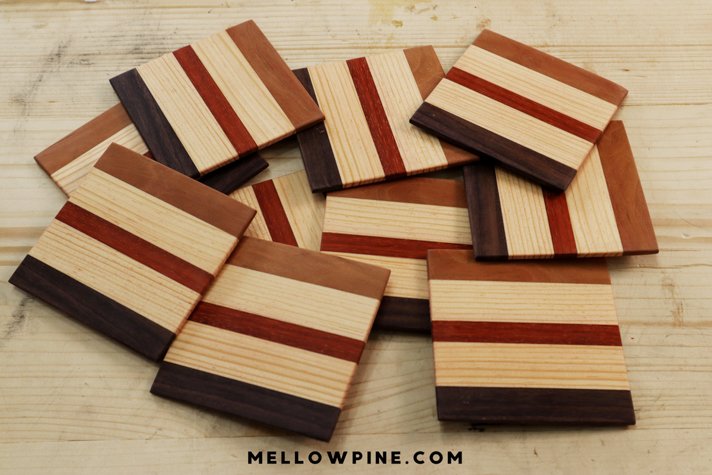
Ok, so that’s it. There you have the coasters with the holder. I think this is probably one of the classiest things we’ve ever made.
If you liked this project, you’ll love other scrap wood projects of ours,
- DIY wooden spice rack for kitchen
- DIY Knife block for kitchen
- DIY Geometric Wood Wall Art
- DIY serving tray with handles
- DIY Burned Wood Geometric Wall Art Project
Another Kitchen build we did:
If you liked this project, please take a moment and pin the photo below to your DIY/Home Decor/Wood Projects board.
How to make wood coaster and a coaster holder
This is an easy to do DIY project for making a wood coaster and a coaster holder
Materials
- Scrap pieces of pine, padauk, cherry and walnut/rosewood with at least 4 inch width
- Sandpaper
- Wood Glue
- Homemade Paste wax or Rubio Monocoat
Instructions
Making the Wood Coaster
- Cut 4-1/4 inch wide boards of Cherry (3/4" thick), Pine (1" thick), Padauk (1/2" thick),and Walnut (or Rosewood) (3/4" thick).
- Plane all faces of each piece.
- Glue the pieces together in the order- Cherry, Pine, Padauk, Pine, Walnut.
- Slice pieces of coaster on the table saw with 1/4" thickness
- Use the miter saw to chop off the excess wood to make each coaster 4" by 4" width.
- Sand every coaster to 320 grit.
- Finish with homemade pastewax or rubio monocoat
Making the Wood Coaster Holder
- Take the Walnut (or Rosewood) piece and make 5 square pieces with 3 pieces 4 1/2 inch long and 2 pieces with 4 inch length. These pieces form the 4 sides and the base of the coaster holder.
- To make a pattern on the front piece, mark it on the holder and use the jigsaw to cut out the pattern.
- Glue up the pieces and clamp carefully to put the holder together.
- Sand and finish with homemade pastewax or rubio monocoat
Notes
Do not apply too much pressure or it could break while sanding. You can also make the coasters thicker than 1/4 inch if you want.