


To strengthen floor joists, install mid-span beams or walls beneath the joists. Another method is sistering, which involves attaching new joists to existing joists. Using plywood strips, metal wraps, steel plates, and blocking is also effective in increasing the joists’ strength.
7 Ways to Strengthen Floor Joists
After years of use, floor joists tend to lose strength, potentially causing sagging or floor cracking.
If the spans of floor joists are too large, they can also develop a tendency to bounce or wobble over time.
Replacing floor joists is not an easy task; however, several alternative approaches can strengthen them and enhance their usability.
Here are a few widely used methods:
| Ways to Strengthen Floor Joists | Description |
|---|---|
| Mid-Span Beams or Walls | Helps to distribute the load |
| Sistering | Attaching new joists to existing joists for added support |
| Plywood Strips | Suitable when the space is limited |
| Metal Wraps | Enhance load-bearing capacity |
| Steel Plates | Run along the full length of joists |
| Blocking | Blocks between floor joists prevent sagging |
| Increasing the area of band joist | Improves lateral stability |
1. Using Beams or Walls as Support for Floor Joists
Using beams or walls as a support to your floor joists is an excellent way to strengthen them.
If obstructions and loss of headspace are no problem, beams and columns provide sufficient strength to joists.
They are even applicable to basements; however, consider the configuration of beams and columns before installation.
When adding beams, it is also important to include proper footing to support the columns.
Normally, small footing sizes are required for wooden beams, but in the case of steel beams, a larger footing size is more optimal depending on the load of the beam.
Moreover, the rigidity of the beam will be in direct relation to the spacing between each column and footing.
The closer the columns and footings are, the more strength the beam will offer as a support to the floor joists.
First, create a hole in the ground beneath the basement and fill it up with concrete.
Then, using hydraulic jacks, fix a beam under the midspan of the floor and install a column between the beam and the ground.”
Instead of wooden beams, you can also use custom-built beams for strengthening the joists.
Built-up beams offer more strength and are useful if the floor loads yield a very large value.
Similarly, you can erect a wall to support the joists from underneath.

You might be interested in this- Joists vs Beams vs Girders
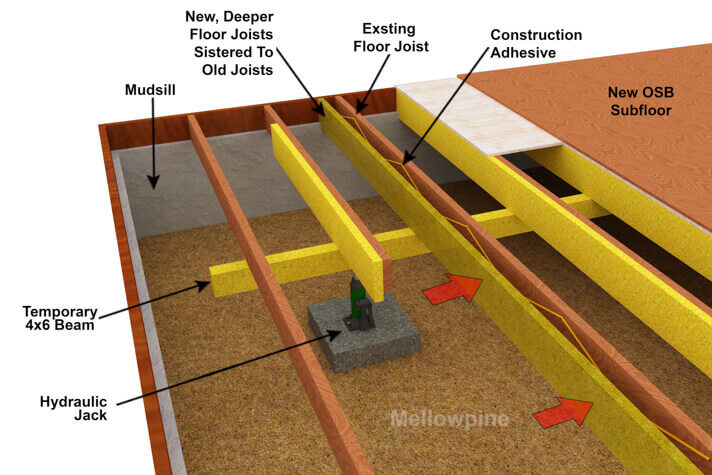
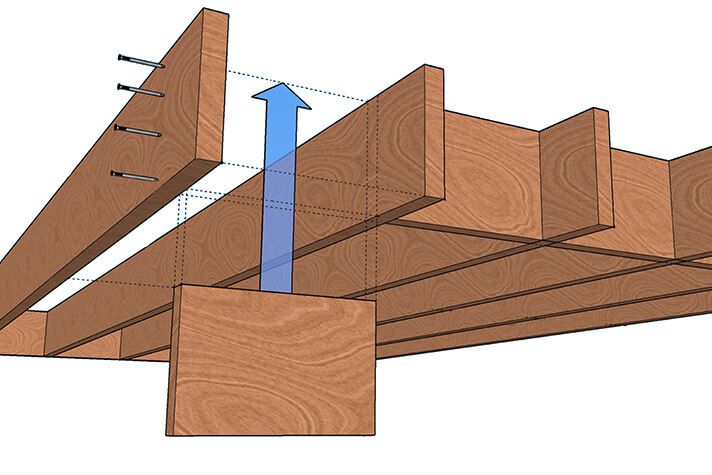
2. Joist Sistering to Strengthen Floor Joists
If one joist does not suffice, try adding another joist alongside an existing one.
This process is known as sistering of joists and is proven to be quite effective in increasing the strength and stability of floor joists.
The size of the sister joist may be kept the same as that of the original joist.
However, using a taller joist offers greater resistance, although notching is required to align it with the fixed level of the original joist.
The increased depth proves more strength and reduces the wobbling of joists by a great deal.
Engineered wood joists can be used to sister the initial joists instead of standard lumber joists.
Furthermore, when additional strength is necessary, install sister joists on both sides of the original joist.
If the existing joists are sagging or bowing downwards, first jack them up and then attach a sister joist.
The adhesive used between both joists further helps reduce the squeaking sounds that may have developed due to the deterioration of the joists.
Align the top of the sister joist with the original joist, and if the bottom section is longer, cut it from the middle and then rest it upon the sill plate.
Finally, use 10 d to 16 d nails to join the joists together.
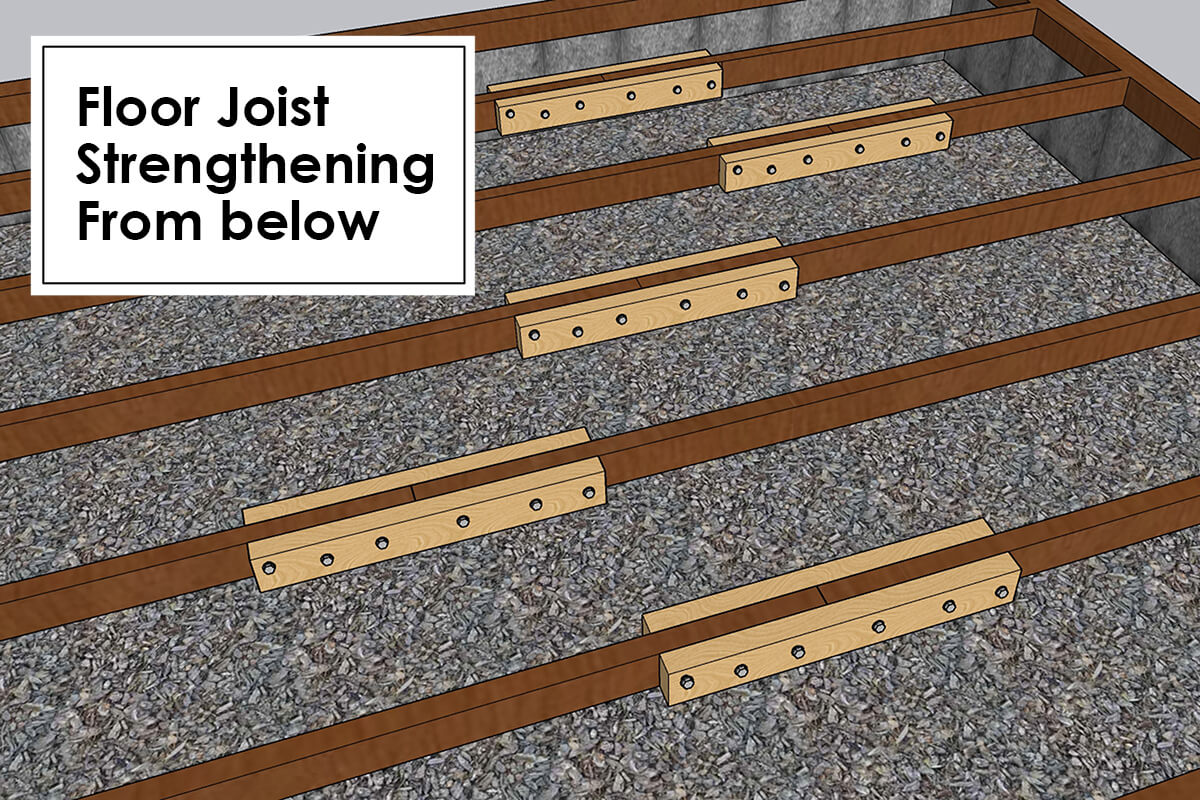
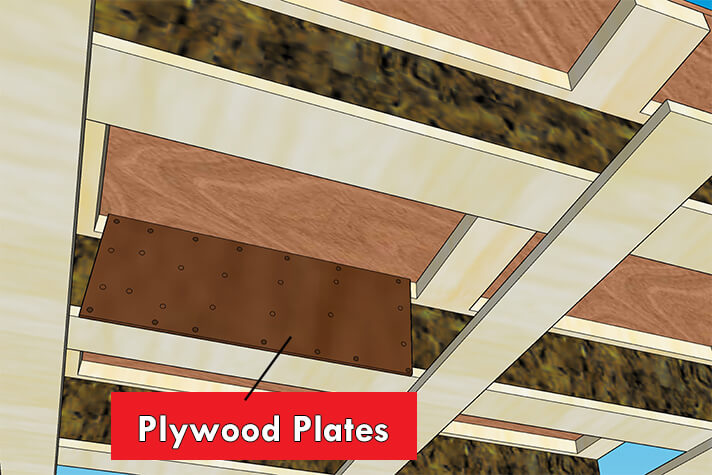
3. Using Plywood Strips
When floor space is restricted, and sister joists do not seem like an approachable choice, plywood strips serve as an excellent replacement.
Apply two strips of flexible plywood to one side of the wobbling floor joist.
Plywood strips are not only shorter but lighter and more flexible, which makes their installation process quite easy, especially in spaces where full-sized joists cannot be added.
¾” strips of plywood are cut and matched to the dimensions of an existing floor joist.
The connection is made solid using a strong construction adhesive.
The overlap is further strengthened using 8d nails or 2″ screws.
One major recurring inconvenience is the bounce that develops on the floor over time.
In such cases, replacing old floors may not be a solid option.
Alternatively, it is recommended to use plywood strips to reduce the bounce on existing floors.
Normally, planks are used to construct the floors above joists. When considering remodeling or replacement of an old floor, or even when adding a new one, use plywood.
Nail the plywood subfloor into existing floor joists, creating a sheathing over the existing deck. The flexibility of plywood considerably reduces the floor’s bounce.
Plywood also offers a solution to strengthening the joists of second floors of houses, where the joists are not as easily accessible through the first-floor ceiling.
The transitioning of material and the installation process itself are made quite more convenient when opting for plywood.
You can install the plywood sheathing at the top and bottom of the joists.
To do this, first, apply construction adhesive to the old run-down planks.
Afterward, lay new sheets perpendicular to the floor joists and use nails or screws with sufficient length to penetrate through the plywood sheathing and into the joists to secure the plywood in place.
Similarly, install sheathing on the bottom side if the level of the joists is the same throughout the deck.
The same method can be applied to install the sheathing on the bottom side if the level of the joists is the same throughout the deck.
If the level varies by more than ½”, it is not possible to apply the sheathing using this method.
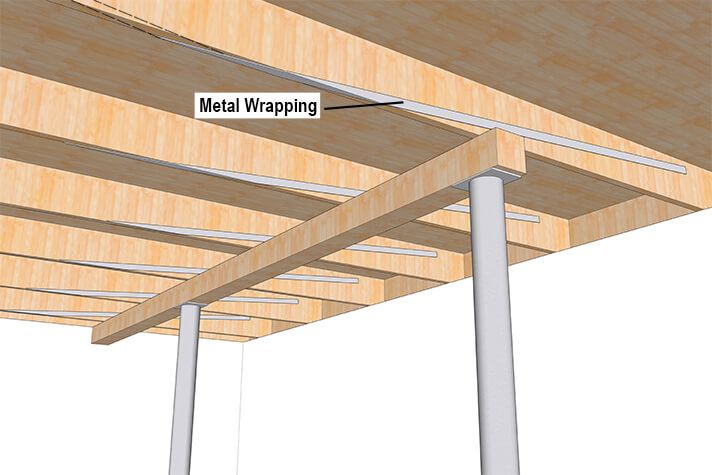
4. Using Metal Wraps
Wrapping steel straps around the joists helps in distributing the loads more efficiently along the ends of the joists.
The most effective way to do this is to start wrapping from the top of one side of the joist, then towards the bottom of the midspan of the joist, and then again towards the top of the other end of the joist.
The load applied towards the center of the joist in this configuration is distributed along with the nails that run through the joists.
Metal straps are also quite easy to install.
To install metal strips, first, use jacks to raise the joists and set up temporary beam support.
Afterward, drive metal connector nails along every hole for the first 2 ft. from the top of one end and then nail holes every 6″.
Repeat the same process on the opposite side.
Fold the strap neatly along the bottom at the midspan.
If additional support is needed, you can install more straps.
After installing the straps, remove the temporary beam support.
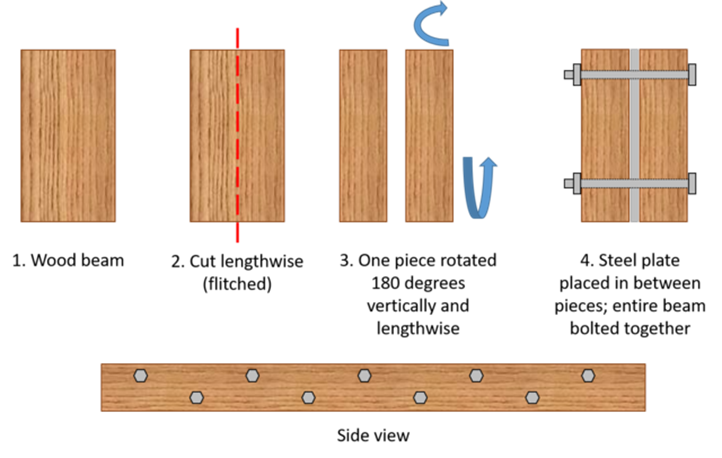
5. Using Steel Plates
Steel can be used to reinforce different types of floor joists. One such technique is called the steel flitch plate method.
In this method, steel plates are sandwiched between two adjacent floor joists and bolted at the ends.
To gain maximum effectiveness, ensure that the plates run along the full length of the joists. In this way, the plates are supported at the ends.
However, using steel plates limits the space for drilling. Consequently, it can hinder the process of passing ducts and wires.
Although steel provides more strength, the overall benefits of using a simple wooden sister joist may be more practical.
6. By Blocking of Floor Joists
Solid blocking is another technique used to improve the performance of engineered I joists and trusses.
Using wooden blocks between adjacent joists helps in transferring weight along the joists in a more unified manner.
However, floor joist blocking is only effective if it is tight.
Metal and wooden blocks are prone to loosening as time passes due to expansion and contraction.
The best time to induce the blocking method is during early spring when the moisture content in the joists is at its lowest.
This is because the technique works best when the joists are dry.
The blocks are cut in proportions that are a bit larger than the space offered by the joists. This ensures that the blocks will be tightly packed.
Afterward, install them perpendicular to the joists.
If ductwork is in the way, use two separate smaller blocks and drive nails through the joist and blocks.
Provide additional support by adding more blocks in an equally spaced manner.
7. Other Options
Increasing the area of the band joist in the frame can also be a good option to reduce the bounce of a floor.
This can be done by installing double-band joists across the longitudinal sides of the perimeter
What is the Best Way to Strengthen Joists?
The best way to strengthen floor joists is to provide support at the midspans using beams or walls. However, space restrictions can make this impractical in some situations.
Steel reinforcement and metal wrapping are also quite effective but are costly compared to the other options. Blocking may also yield sufficient strength but is prone to loosening.
Sistering of joists is easily executed, provides sufficient strength, and is cost-effective as well. Plywood offers the same benefits with the added advantage of being even smaller in size.
All options offer some advantage over the other. Identifying the best method will depend upon the site conditions and restrictions.
If space is plenty, beam support would be the ideal way to go.
Why Do Floors Sag?
In residential houses, the floors sag over time due to insufficient support and load transfer mechanisms.
When not enough beams are provided to support the weight of the above floors, the existing beams must work harder, and as such, they start to weaken over time.
Another reason why floors start to sag is because of the rotting of floor joists.
If the crawl spaces or basements are not appropriately sealed, rotting may occur because of moisture and humidity acting on the joists.
To avoid damage, use low-pressure fans and dehumidifiers to dry the joists.
Since wood is a common material used in constructing a joist system, mold may develop and eat away at the strength of the system. Termite action may also cause the joists to rot.
Additionally, poor soil causes the floors to sag by initializing the settlement of foundations and columns.
For large-span construction, opt for floor trusses instead of floor joists to prevent sagging.
What are The Signs of Damaged Floor Joists?
- Mold growth in crawl space and basements
- Sagging floors
- Creaking sounds
- Cracks in the walls and floors
- Difficult to open and close doors and windows
- Nails or screws popping out of the floorboards
How Much Does it Cost to Reinforce Floor Joists?
The cost of reinforcing the floor joists depends on the extent of the damage and the materials used.
Generally, the cost of reinforcing joists is $100 to $500 per joist, depending on the method you use.
Reinforcing floor joists is more cost-effective than replacing them, which costs around $10,000 to $20,000 for a home.
Frequently Asked Questions (FAQ)
Does Drilling Holes Make Joists Weaker?
Drilling holes in joists will weaken the strength of floor joists. The allowed limit of a hole is a diameter of 1/3 times the depth of a joist. Holes must also be centered at least 2″ away from the top and bottom.
Can you Replace the Floor Joist without Removing the Floor?
If sufficient crawl space exists, then it is possible to replace floor joists without removing the entire floor. However, it is not practical in all cases.
Does Insurance Cover Rotten Floor Joists?
Insurance policies do not cover damage caused by wear and tear or lack of maintenance. However, if the damage to your floor joists is the result of a covered peril, such as a sudden and accidental water leak or a fire, your insurance policy may provide coverage.