


Your cart is currently empty!
By
John Abraham
John Abraham
Hi, I’m John. At Mellowpine, I write about relationships, family connections, and ways to build stronger bonds in everyday life. I love sharing practical tips and thoughtful insights to help couples, parents, and grandparents bring more joy into their relationships. If you’d like to connect, feel free to reach me at mail@mellowpine.com.
| UPDATED

Although wood is one of the easiest materials to laser engrave, challenges such as overburnt edges, smoke stains, and uneven contrast can come up during laser engraving wood.
But don’t fret! Following proper preventive measures and implementing optimal process parameters can help overcome these challenges and produce high-quality engraving on wood.
This article provides a complete guide for laser engraving wood and discusses various ways to overcome the challenges faced during the process.
MellowPine is reader-supported. When you buy through links on my site, I may earn an affiliate commission at no extra cost to you.
Laser Engraving Wood- The Basics
Wood is easy to laser engrave and produces good contrast when engraved properly.
You can laser engrave wood using a low-powered CO2 laser, or a diode laser with a power rating of around 10W or above.
A CO2 laser is more suitable for professional applications where you have to engrave a large volume of workpieces with minimal engraving time, while a diode laser is suitable for most hobbyist and DIY applications.
In contrast, a fiber laser is not recommended for engraving wood as it can set wood on fire instead of engraving it.
Watch the video to learn more about laser engraving wood using diode lasers. I engrave wood using 5W, 10W, and 20W lasers.

How to Laser Engrave Wood
Laser engraving wood requires access to a good quality wood laser engraver and knowledge about a few basic steps to begin the engraving process.
Step 1: Prepare the Design
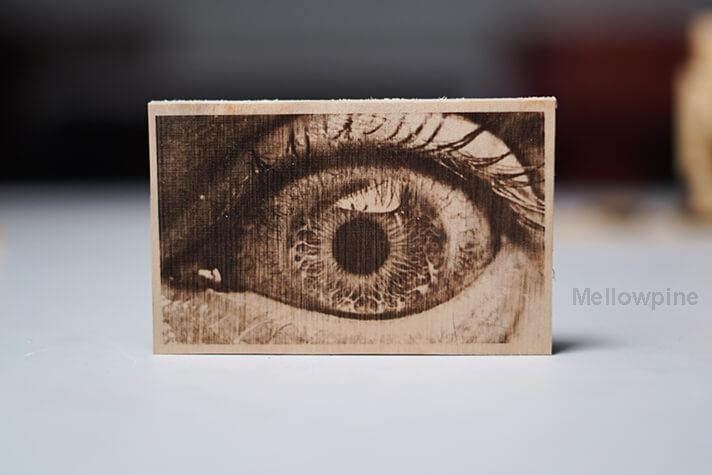
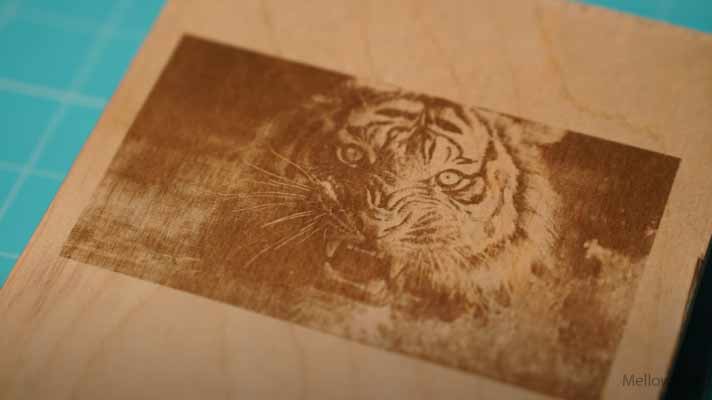
Generally, when preparing the design file to engrave a photograph on wood, choosing a close-up image of the subject with a light background is recommended.
Furthermore, the dithering pattern of the image plays an important role in determining the quality of a raster engraving.
It adds desirable noise to the image and enhances the visibility of the engraving.
I personally prefer the dot patterns such as Jarvis, Atkinson, or Stucki modes as they improve the visibility of the engraving and provide the best results for laser engraving on wood.
When preparing the design file, overlapping design elements must be avoided to attain a uniform engraving with no burn marks.
For digital images with no shadows and intricate details, you can use the Image trace option to trace the outline of the design and vector engrave the outline after performing the raster engraving to make the engraving stand out.
Step 2: Selecting the Type of Wood
There are various types of woods that are suitable for laser cutting and engraving projects, but selecting the appropriate wood for your application enhances the quality of the engraving.
For example, laser cutting Victorian Ash produces a clean cut with minimal edge burns, but its bi-colored grain pattern results in poor visibility of the engraved design.
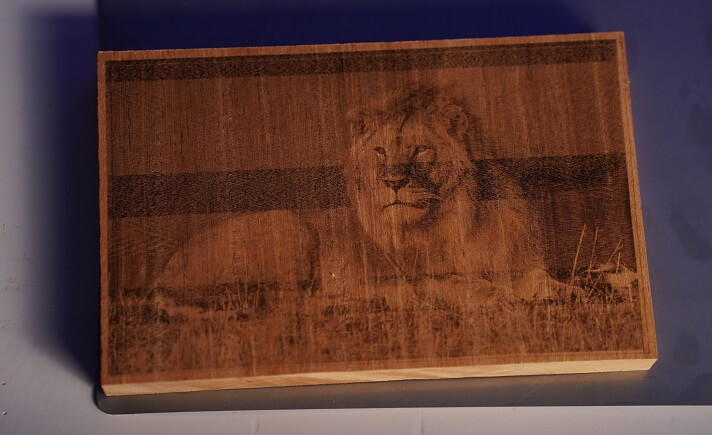
On the other hand, laser engraving hardwoods like Mahagony, cherry, and walnut produce excellent results, but their darker colors result in lower contrast.
The lighter shade of Mahagony makes it ideal for fine detailing work like engraving photographs.
Similarly, European Beech is also suitable for engraving projects as it consists of tiny flecks instead of long grains in the wood fiber.
It must be noted that finishing products like oil and stain, which are absorbed by the wood, should be applied before engraving because they cause the wood to swell and might result in the loss of fine detailing from the engraving.
Whereas surface products like a sealant and other protective coatings are not absorbed by the wood and, therefore, can be applied after engraving as they do not cause the wood to swell.
Step 3: Set the Optimal Laser Parameters
| Parameter | Recommendation |
|---|---|
| Type of laser | CO2 or Diode laser |
| Laser power | 10W or above |
| Engraving speed | Moderately high speed |
| Resolution | 254 DPI or above |
| Air assist | Very low pressure |
| Exhaust system | Strongly recommended |
| Laser focus | Focused for vector & slightly defocused for raster engravings |
Laser parameter for engraving wood
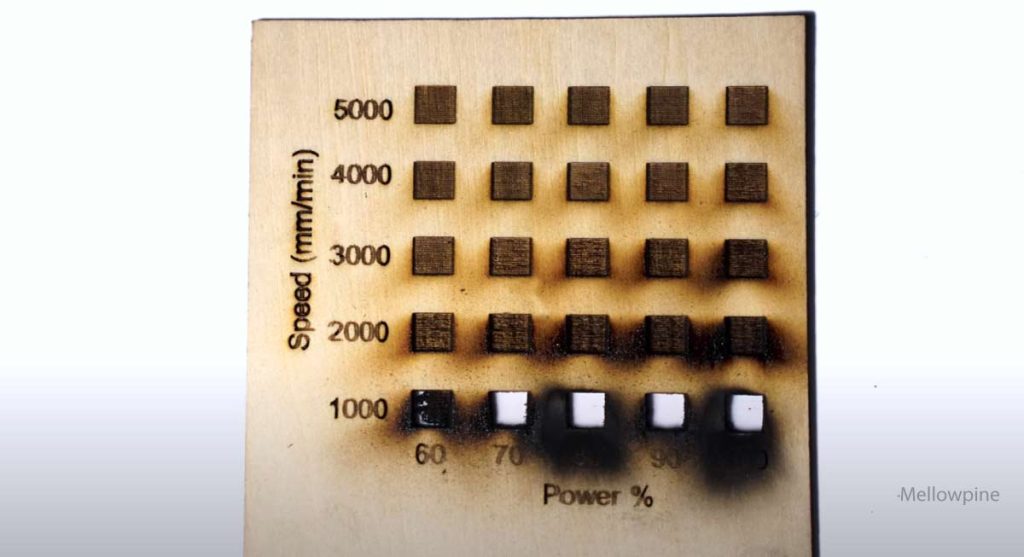
1. Perform Test Runs
The optimal parameters for laser engraving wood depend upon various variables, such as the type of wood, type of laser, laser power, and other environmental factors.
Therefore, it is strongly recommended to perform test runs before working on the actual workpiece.
These test runs enable the user to understand the effect of different parameters and find the optimal settings that produce the best results for their application.
A square matrix is one of the most commonly used templates for performing laser engraving test runs.
When engraving on wood, it is preferable to perform the test runs at the same resolution (line interval) that you plan to use for the actual workpiece.
This is because changing the line interval significantly affects the depth and darkening of the engraving on wood.
2. Set the Optimal Laser Power and Speed
Generally, a low-powered CO2 laser or a diode laser with a power rating of around 10W or above is recommended for laser engraving wood.
Using a higher-powered laser leads to faster engravings with greater depth, but using a high laser power with a low engraving speed can result in over burning of wood and cause fire hazards.
Whereas low laser power with high engraving speed will result in low-contrast engraving with poor visibility.
Therefore, it is important to maintain a perfect balance between the laser power and engraving speed to produce a good quality engraving with minimal or no edge burns.
A 20W xTool D1 Pro can perform high-contrast engravings on pine wood at around 12,000 mm/min and 90% power.
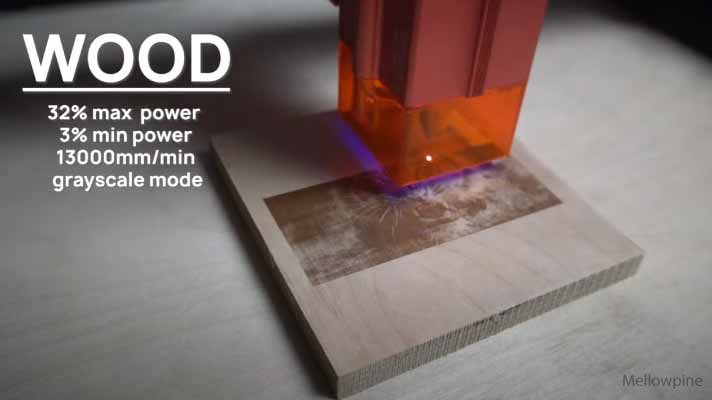
To engrave a greyscale image on wood, I ran my 24W Atomstack A24 Pro at 3% to 32% power range and 13,000 mm/min speed.
Furthermore, high-powered CO2 laser engravers can also produce 3D laser engravings on wood by using the multi-pass technique.
When performing 3D engraving, it is recommended to use high power and slow speed for initial passes to remove the maximum amount of material.
Followed by a final pass with low power, high-speed combination to improve the surface finish of the engraving.
3. Set the Right Engraving Resolution
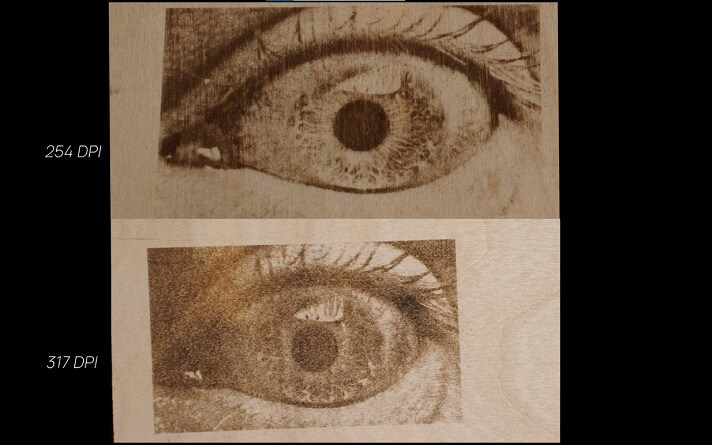
The number of dots per inch (DPI) or the Line interval determines the resolution of the engraving.
These dots are similar to pixels in a bitmap image. The higher the number of dots, the higher the engraving resolution will be.
Generally, when laser engraving wood, a resolution of 254 DPI produces a high-quality engraving with good detailing and high contrast.
However, increasing the DPI does not always mean better engraving results.
The DPI for laser engraving should be less than or equal to the DPI of the actual image used for engraving,
Setting a higher engraving DPI is like asking the laser to engrave the details that are not present in the image. So, the laser overlaps the existing pixels and produces a poor-quality image with no details.
Another factor that determines the engraving resolution is the spot size of your laser.
4. Adjust your Laser Focus
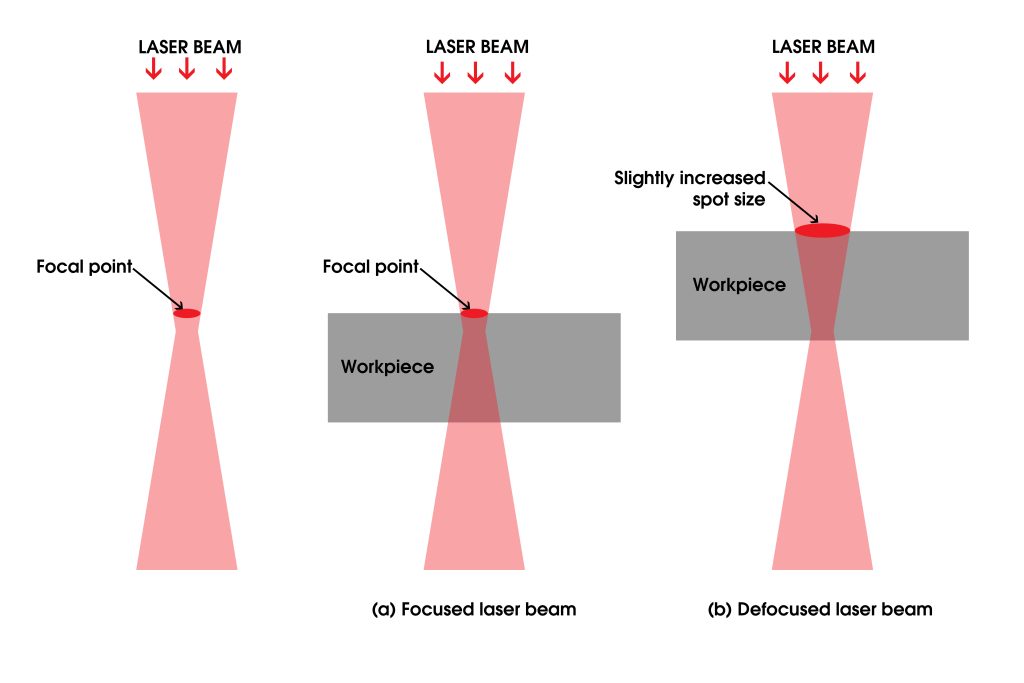
When laser engraving wood, it is recommended to slightly defocus the laser (around 1mm) to increase the spot size.
Although defocusing the laser results in a loss of detail, it produces smoother engravings with good contrast that blends into the surface of the wooden workpiece.
Whereas a focused laser with tight spot size is preferred when performing vector engravings on wood, as it produces fine-line engravings with high precision.
Therefore, it is important to learn how the material behaves when processed under a laser and identify the optimal laser parameters accordingly.
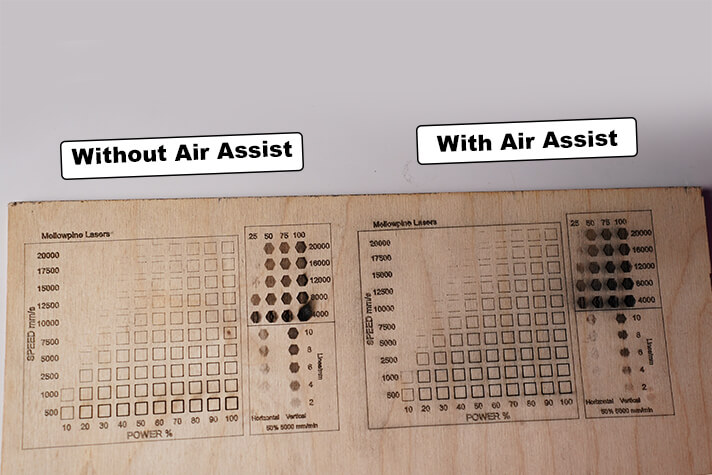
5. Use Appropriate Air Assist
Generally, it is advised not to use the air assist during the engraving jobs as it can cause smoke stains on the wood.
However, when working on large engraving projects, I personally set my air assist to low pressure, which prevents the smoke and dust from accumulating on the focusing lens without causing smoke stains on the wood.
Step 4: Execute the Engraving Process
After preparing the workpiece, you can place it on the work table and execute the engraving process.
However, it must be noted that wood is a highly flammable material that can catch fire and result in fire hazards.
Therefore, it is strongly recommended to monitor the engraving process and strictly follow the laser safety protocols to prevent accidents.
Step 5: Finish the Workpiece
After successfully executing the engraving process, the workpiece might require some finishing.
Generally, deep laser engraving leads to overburning and sap coming out of the wood, which degrades the surface finish of the engraving.
It is recommended to clean the engraved area with soapy water and a brush/cloth to rub off the unwanted stains and produce a clean surface.
Furthermore, staining the wood with a suitable color can enhance the contrast of the engraving.
Challenges in Laser Engraving Wood
Although wood is one of the easiest materials to laser engrave, you need to be wary of some challenges that laser engraving wood can throw up.
1. Smoke Stains on Wooden Workpiece
Laser engraving wood generates heavy smoke that can stain the workpiece and affect the engraving quality.
Using a quality exhaust system can help quickly dispose of the smoke away from the workpiece and reduce the risk of stains.
Furthermore, selecting the bottom-up engraving direction with low-pressure air assist will facilitate easy removal of the smoke by forcing it towards the exhaust vent (if your exhaust is at the upper side of the enclosure).
2. Uneven Contrast
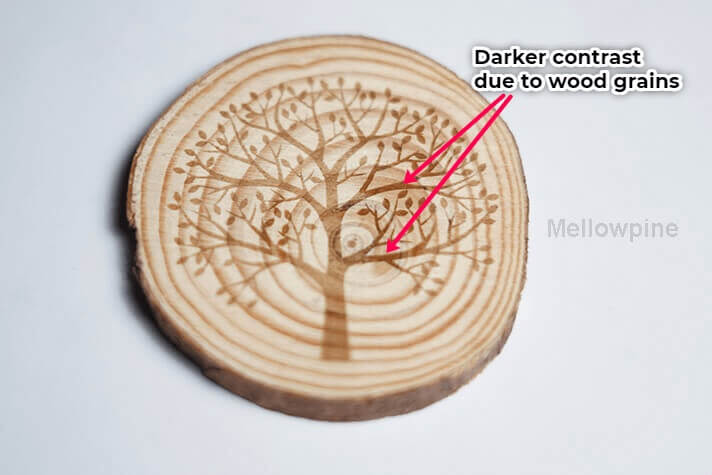
The choice of wood plays a vital role in determining the contrast of the engraving.
Different color woods produce different contrasts when laser engraved.
Therefore woods with bi-colored fibers and flecks can result in uneven contrast as these flecks and fibers burn differently than the rest of the wood.
Furthermore, aligning the grains of wood to be perpendicular to the left and right motion of the laser during the engraving process can also improve the contrast of the engraving.
Laser Cutting Guides for Other Materials
Check out these guides on laser cutting and engraving some popular materials.
| Material | Link to Guide |
|---|---|
| Paper | Laser Cutting Paper |
| Acrylic | Laser Cutting and Engraving Acrylic |
| Aluminum | Laser Cutting and Engraving Aluminum |
| Leather | Laser Cutting and Engraving Leather |
| Plastic | Laser Cutting and Engraving Plastic |
| Polypropylene | Laser cutting polypropylene |
| Brass | Laser Engraving Brass |
| Felt | Laser Cutting Felt |
| Fabric | Laser Cutting Fabric |
| Foam | Laser Cutting Foam |
| Plywood | Laser Cutting Plywood |
| Glass (cutting) | Laser Cutting Glass |
| Glass (engraving) | Laser Etching and Engraving Glass |
| Wood (cutting) | Laser Cutting Wood |
| Wood (engraving) | Wood Laser Engraving |
| Granite | Laser Engraving Granite |
| Vinyl | Laser Cutting Vinyl |
| Food | Laser Engraving Food |
Laser Cutting Guides for other Materials
Frequently Asked Questions (FAQ)
What is 3D engraving?
3D engraving is a type of deep laser engraving in which material removal occurs at varying depths. It requires a powerful laser to engrave at varying depths and is generally used for producing artwork with intricate patterns and designs.
Can a diode laser cut wood?
Yes, a diode laser can cut wood. Although the low power output of diode lasers limits them from performing through cuts in thick wooden workpieces, they can perform clean cuts in thin wood by using the multi-pass technique. The low power of diode lasers is more suitable for laser engraving wood and can even be used for engraving photographs on wood.
Does laser engraving wood produce toxic fumes?
No, laser engraving wood does not produce toxic fumes. However, certain engineered woods, such as MDF, contain formaldehyde resin to bind the wood fibers. This formaldehyde resin produces toxic fumes when burnt under a laser. Although laser engraving natural wood does not produce toxic fumes, it produces heavy smoke that can cause irritation to the lungs. Therefore, it is strongly advised to use a good quality exhaust system when laser engraving wood.